Выведение девайса из комы
Среда, 21.05.2008 IP Office 406v2, issues
Привезли IP Office 406v2, предварительно прислав по e-mail «предсмертный лог». Перед отправкой станции в гарантийный ремонт её отдали мне (хотя мои знания мизерны).
Анамнез. После попытки перепрошивки на текущую версию 4.1(12) — в скобках минорные обновления — через IP Office Manager появилось сообщение об ошибке, что Control Unit не перезагрузится. После выключения-включения питания система не инициализируется. Состояние индикаторов:
- слева от разъема для Compact Flash (для встроенной голосовой почты) индикатор Unit Status LED горит красным, а должен зеленым, если система стартовала
- левее 16 круглых индикаторов Port Status LED (Trunk, EXP, CF, WAN) — все горят зеленым (постоянное свечение — Present, мигание — activity)
- еще левее разъемы RG45 для DS (Digital Station) порты 1-8 — все восемь горят зеленым (т.е. якобы телефоны подсоединены)
В помощь нам документ DTE Port Maintenance, раздел Erasing the Operational Software. Понятное описание процесса ниже. Варианты исполнения серийного порта на тыльной стороне для разных версий IP Office: DTE PORT on 403 & 406v1 units: 25 pin. DTE PORT on SOE, 406v2 & 412 units: 9 pin
Подсоединение: серийный com-порт DTE на тыльной стороне (у нас 9-pin мама). Для подсоединения компьютера к потру DTE станции IP Office можно использовать стандартный модемный кабель. Характеристики соединения через гипер-терминал:
- Bits per second: 38,400.
- Data bits: 8.
- Parity: None.
- Stop Bits: 1.
- Flow Control: None.
- Settings | Emulation: TTY or VT100.
Выяснение версии софта загрузчика (bootloader) из гипер-терминала.
Подключиться к порту DTE с настройками, указанными выше. Подключить питание IP Office. В общем случае, когда все работает, надо нажимать ESC несколько раз. У нас процесс инициализации не завершается (мы так и остаемся в загрузчике), можно ESC не нажимать. В окне появится информация (пример из нашего случая):
Programming FPGA ...
FPGA Version 0xFC
CPLD Revs: 0xC1 0xD4
CardID: 0x3A Modules: 0xED
Broadcom Switch Mode was 0xF5 now 0xF6
EthChipRevId: 0x37 EthPhyId: 0x004062B3
P12 Loader 2.4
CPU Revision 0x0900
То, что мы остаёмся в загрузчике, свидетельствует о том, что у unit (у блока IP Office) нет софта (следствие несостоявшейся перепрошивки).
Своему компьютеру надо задать статический IP-адрес 192.168.42.11 или выше, для IP Office IP-адрес в промежутке между 192.168.42.1 (обычно 192.168.42.1) и 192.168.42.10.
Нужно, чтобы была открыта программа IP Office Manager. В настройках File→Preferences во вкладке Discovery в пункте UDP Discovery должна стоять галочка и значение 255.255.255.255, а во вкладке Directories должны быть указаны папки, где лежат файлы .bin и .cfg. Из меню View запускаем TFTP log. Перегружаем IP Office.
Видим информацию о загрузчике (см. выше). Вводим заглавными буквами:
AT — после нажатия Enter блок должен ответить OK
AT-X — после после нажатия Enter мы видим процесс Multi-Sector Erase, потом покажет OK
Теперь смотрим что появилось в TFTP Log
Если пишет:
Received BOOTP request for 00e00702ав39 192.168.42.1 unable to process
то надо создать BOOTP entry, кликнув правой кнопкой на ветке BOOTP→New, или же Ctrl-N. При создании записи вводим MAC-адрес и IP-адрес, которые высветились в TFTP Log. В filename пишем ip406u.bin (бинарник для IP 406v2 Office).
Станция cама закачает с нашего компьютера файл и перегрузится. Индикатор Unit Status LED загорится зеленым, остальные погаснут.
Выводы:
- если Unit Status LED горит красным, а все 16 круглых индикаторов зеленым, то станция не умерла, а просто в системе отсутствует софт (как в компьютерах — загружается BIOS, а операционной системы нет).
- если в гипер-терминале не появляется версия загрузчика, проверить серийный кабель.
- подсоединяясь витой парой к IP Office по IP, отключить компьютер от интернета (если несколько соединений по IP), чтобы не было влияния других серверов
- даже при потере софта IP Office не теряет IP-адрес, который вы назначали, т.е. IP-адрес не будет тем, который задан по умолчанию при поставке станции
- если софт теряется, unit не пингуется, но он работает и ищет софт
- станция может апгрейдиться с предыдущей версии IP Office Manager, но конфигурировать станцию уже не получалось — она не распознавалась после широковещательного опроса сети. После установки IP Office Manager 6.1(12) все было ОК. Для апгрейда иметь статический айпишник, для конфига DHCP подойдет.
ACCS
Какие лицензии нужны для ACCS Contact Center Select: What are the licenses needed if Avaya Contact Center Select integrates with IP Office 500V2 Rate Content Rate this Page If your Avaya Contact Center Select integrates with IP Office 500V2 (non-Server Edition), then IP Office 500V2 requires the following licenses: • One Avaya IP Endpoint license for Avaya Contact Center Select integration • One Power User license per agent or supervisor (all license) • Advanced Edition license • Preferred Edition License • Essential Edition License • SIP Endpoint licenses – either Avaya or Third-Party depending on the IP phones used in your solution. If your solution uses only digital telephones then you do not require endpoint licenses • One CTI Pro license • Voicemail Pro Additional Voicemail Channels • SIP Trunk licenses or channels licenses to support the trunks used in your solution • Voicemail Pro Recording Administrators. One instance on each node of the Small Community Network (SCN) that the calls are recorded from. If all recording is to be done on the Primary node then one instance is required. This license enables Contact Recorder. Contact Recorder requires a separate Application Server.
Access the A1S or PLDS.avaya.com web site and click on Regenerate using the correct PLDS host ID. Для блока IP Office Control Unit, номер PLDS Host ID, к которому привязана лицензия, состоит из id карты памяти IP Office SD card ID c добавленными впереди единицами “1” так, чтобы в сумме вышло 12 цифр. Например, если SD card ID равен 1234567890, то PLDS Host ID будет: 111234567890
For other PLDS issues, you can submit a ticket on line via the Self-service Portal: Visit IT Self Service (ITSS) partner-itss.avaya.com to check for status or open a ticket online.
IPOCC: Lost WebLM Licenses - Host ID does not much with PLDS Rate Content Rate this Page IPOCC Any Release. Occurred on IPOCC r10.0.0.3 Host ID на IPOCC WebLM сервере сменился самостоятельно IPOCC WebLM потерял лицензии после окончания 30-дневного grace Period IPOCC Host ID’s were different after a previous disable of 2nd NIC… which activated the 30 day grace period, Перегенерировать лицензию в PLDS with NIC1 Host ID, залили новую лицензию на WebLM.
PLDS Nodal
PLDS (Product Licensing and Delivery System) licenses can be hosted in the network in one of two ways: WebLM Centralized Licensing A PLDS file containing the licenses is uploaded to the WebLM service running on the network’s primary server. Thelicenses are issued/validated against the host ID of the WebLM service. That ID is automatically generated from various initial configuration settings of the server but does not subsequently change. Through their license menus, the servers in the network, including the primary, request licenses from those available. Due to its flexibility this is the recommended method of licensing.
Local Nodal Licensing A PLDS license containing the licenses is uploaded to the IP Office service running on the server. The licenses are issued/validated against the PLDS Host ID of the server. That ID is automatically generated from various initial configuration settings of the server. As a result of certain system configuration changes that ID may also change, see below. Nodal PLDS Host ID Restrictions If the server is hosting its own licenses, then Avaya validates each license against the server’s unique PLDS Host ID. For an IP Office virtual machine, the IP Office generates the PLDS Host ID based on a number of factors:
Deployment Specific Factors The PLDS Host ID is partial based on a number of factors relating to the particular virtual machine’s deployment. Redeploying the virtual machine will change its PLDS Host ID. That will immediately invalidate any licenses already in the IP Office configuration. To move the virtual machine to another virtual server platform without requiring new licenses, use vMotion.
Configuration Specific Factors The PLDS Host ID is also partial based on the following parameters of the virtual machine. Changing any of these parameters changes the virtual machine’s PLDS Host ID:·Host Name, LAN1 IP Address, LAN2 IP Address, Timezone and DHCP Mode
Contact Center License Manager не может стартовать т.к. Avaya License Service уже работает.
Причина Avaya License Service стартует в автоматическом режиме, и получается что запускается раньше CC License Manager.
AMS должен получать лицензию с CC License Manager.
После установка ручного запуска (Manual) для сервиса Avaya License в services.msc и следующей перезагрузки License Manager может стартовать и проблема решается.
Не стартует CC License Manager: Set License Manager start up registry flag “LMStartupSuccessful” to 0. Start up was unsuccessful.
Сетевая карта NIC (с новым мак-адресом) изменилась на сервере и сервер перегрузился. Лицензия была привязана к мак-адресу оригинальной сетевой карты и поэтому не совпадала с новым MAC адресом. Решение: перегенерировать лицензию на новый мак.
Embedded VM - To Allow different Day/Night message and Manual switching.
This enables manual switching between day and night. Tested on all Version 4.0 builds as a worker.
STEP1 Create a system shortcode. “SC 666 Tel “#Reception” Feat VM Collect
STEP2 Create a user. In my example I have made it extension 40, DayVMAnswer. Set VM to off. Forward to shortcode 666 for Unconditional & Huntgroup/internals. Also in user tab, select ex directory so its hidden away. I always allow it to create a VoIP extension too, as I have seen it where it will not work unless this is done in early 4.0 versions.
STEP3 Hunt Group 1
- Name it VM Answer, with an extension number.
- Set type to be Sequential/hunt and queuing on and VM on.
- Add your created user above in step2
STEP4 Group 2. YOUR MAIN RING GROUP. Reception, Extension 401 (Or your choice)
- Add your users you wish it to ring,
- Set your group style,
- Set your timers.
- VM Must be off.
- Add your Huntgroup 1 to the overflow list.
Basically what this is doing it going to huntgroup 1, it then overflows to another group via a phantom user, this group has VM on, but because it has the issue we all struggle with it still plays the main day greeting.
STEP5 Group 3. Now build your night group. My example used the below settings,
- Set group to sequential
- Add your users you wish to be able to get into mail box, without access code. But untick them so they do not ring.
- Turn on VM.
STEP6 Ensure your users set the group OOS & NOT Night Service for Key programming purposes.
STEP7 In your incoming call route, set your fallback/night service destinations to be your nightgroup created in step 5.
STEP8 Create VM Collect Keys so you can get into mailboxes to change creatings and collect vm.
Examples SC 201 Tel “?Reception” or your decided group name Feat VMCollect
SC 202 Tel “?Night” or your decided group name. Feat VMCollect
Test and record greetings
Pickup-группы в Avaya IP Office
Здесь, в отличие от медиасерверов, не существует как таковых pickup-групп — перехватывать друг друга могут абоненты hunt-группы:
- collective — звонят одновременно все телефоны в группе
- sequental — поочередный обзвон телефонов в группе начиная с первого по списку (сверху-вниз)
- rotary — каждый следующий внешний вызов начинает обзваниваться с абонента, находящегося в списке ниже того, кто ответил на предыдущий вызов. Телефоны обзваниваются по кругу.
- longest waiting — обзвон начинается с абонента, который был свободен больше других после окончания своего последнего разговора
У хант-групп обязательно есть внутренний номер (не порядковый, как для pickup-групп медиасерверов), можно на него назначать входящие городские вызовы, а можно ничего не назначать — тогда группа будет функционировать только как pickup.
Примечание: есть функция Dial on Pickup, но это Hotline, т.е. горячая линия — автоматический набор какого-либо номера при поднятии трубки.
Коды функций в IP Office задаются в ветке Short Codes (аналог ch fea). Здесь с кодами функций по умолчанию, наклонным обозначены сочетания клавиш, которые можно прописать и в Short Codes, и через Button Programming свойств телефона, подчеркнутым — то, что назначается только в меню Button Programming свойств телефона (такие кнопки можно назначить самостоятельно себе на телефоне):
- Самый простой способ — статус абонента. Назначается в меню Button Programming свойств телефона: User→ выбрать внутренний номер из выпадающего списка. Кнопку можно назначить самостоятельно кнопкой Admin (нажать кнопку Admin, затем внутренний номер абонента, подробнее в разделе Self-Administer). Причём кнопка еще работает и просто для вызова абонента. Что происходит:
- Справа от кнопки на дисплее светится имя абонента, в этом состоянии при нажатии кнопки вы вызываете абонента.
- При поступлении вызова светится треугольничек рядом с именем абонента. При нажатии кнопки вы перехватываете вызов и появляется надпись DkPickup.
- Работает, если установлена Group monitoring. Если вы не перехватили звонок и абонент начал разговор, то вы нажатием кнопки можете выбрать несколько опций: Drop — прервать разговор пользователя, Listn — прослушивать разговор, Aquir — перехватить уже ведущийся разговор на себя. На софтовых телефонах PhoneManager и SoftConsole кнопка статуса — это BLF (Busy Lamp Field). Можно создать группу из нескольких абонентов: New→BLF Group→ ввести имя → добавить абонентов (Add) в группу BLF. Проблема с кнопкой BLF может возникнуть, если IP Office и компьютеры, на который установлены SorftConsole, находятся в разных подсетях. Лицензии Poweruser / Teleworker / Office user дают возможность использовать One-X.
- Call Pickup Any — Default Short Code *30 (кроме кода ничего набирать не надо). На цифровом телефоне назначить кнопку Advanced→Call→Call Pickup Any, на дисплее PickA. Перехват вызова любого абонента IP Office. Полезно, если вы не знаете внутренний номер абонента, которого вы перехватываете. Нельзя самостоятельно назначить себе эту кнопку.
- Call Pickup Group — Default Short Code *31 (кроме кода ничего набирать не надо). На цифровом телефоне назначить кнопку Advanced→Call→Call Pickup Group, на дисплее PickG. Перехват звонка, приходящего из города на номер хант-группы, в которой состоит абонент. Если звонок пришёл на номер какого-либо абонента группы, а не на номер самой группы, то перехватить его этим кодом НЕЛЬЗЯ! Если одновременно приходит два вызова на хант-группу, то перехватится тот, который поступил раньше, т.е. телефон, звонящий дольше.
- Call Pickup Members — Default Short Code
*53*N#(кроме кода надо ввести номер хант-группы и решетку). На цифровом телефоне назначить кнопку Advanced→Call→Call Pickup Members, на дисплее PickM. Перехват звонка внутри указанной группы, где N — номер хант-группы. Вызов может приходить как на номер самой хант-группы, так и на любого члена группы, он может быть как внутренним вызовом, так и вызовом из города. - Call Pickup (Emulation→Call pickup) — на дисплее
CPkUp— перехват вызова любого абонента IP Office, рекомендуется использовать когда не так много пользователей IP Office. Можно самостоятельно назначать себе с телефона кнопкой Admin. - Directed Call Pickup (Emulation→Directed Call Pickup) — на дисплее дисплее
DPkUp— перехват вызова на конкретного абонента или на конкретную Hunt-группу (аналог Call Pickup Extn и Call Pickup Members???). Если при назначении кнопки введён номер абонента/группы, то он высвечивается на дисплее рядом с DPkUp и перехват осуществляется единственным нажатием кнопки. Если при назначении кнопке поле абонента/группы оставили пустым, то перехват осуществляется последовательным нажатием этой кнопки и вводом номера абонента/группы. Можно самостоятельно назначить себе эту кнопку с телефона кнопкой Admin. - Call Pickup Extn — 32N# —
СpkUp??????? Путаницы в доке. Фича написано Call pickup Any - Call Pickup Line
- Mobile Twinned Call Pickup — перехват вызова/разговора со спаренного мобильного номера, требуется специальный софт Mobile Twinning
Обход вопроса с отсутствием имен на 1616
назначать Label (подписи) для кнопок Appearance. Вариант: Features→ Phone User→ Phone Screen Settings→Display→ включить, сделать бэкап настроек телфона вручную, тогда после перезагрузки IPO настройки восстановятся.
Установка времени с телефона
вкладка пользователя user→ System Phone Rights- Level 1, Button Programming назначить кнопку Emulation→Self-Administer→ Action Data поставить 2. Дать метку Set time или типа того. Либо Features→Phone User…→ Select→ System Admin…→ Select→ Time…→ Select→ время в 24-часовом формате →*→ минуты→ Done→ Phone/Exit. Для пользователя с правами System Phone Rights уровня 2.
AVPP IP Address: Default = 0.0.0.0 (Disabled) Where Avaya 3600 Series SpectraLink wireless handsets are being used with the system, this field is used to specify the IP address of the Avaya Voice Priority Processor (AVPP).
The following source numbers can also be used on the Source Numbers tab of the NoUser user. These affect all users on the system. Note that these source numbers typically require a reboot of the IP Office system to become effective.
DISTINCT_HOLD_RINGBACK Used to display a specific message about the call type for calls returning after timing out from being parked or held. When configured, the top line on the phone displays Return Call - Parked or Returned Call - Held, instead of the connected party name or line name.
H323SetupTimerNoLCR Used to set the fallback time from VoIP trunks to non-VoIP trunks within LCR. See IP Trunk Fallback.
LONGER_NAMES Used to increase the length of names sent for display on DS phones. See Caller Display.
HIDE_CALL_STATE Used to hide the call status information, for example Dial, Conn, etc, on DS phones. Used in conjunction with the LONGER_NAMES option.
ACD_QUEUE_DELAY=nn Software level = Up to 3.2. Used to change the timeout for still queued messages. The parameter nn can be replace with a time in seconds between 20 and 180. For IP Office 4.0+ this has been replaced by Hunt Group | Announcements.
VM_TRUNCATE_TIME=X Software level = 4.0+, X = 0 to 7 seconds. On analog trunks, call disconnection can occur though busy tone detection. When such calls go to voicemail to be recorded or leave a message, when the call ends the IP Office indicates to the voicemail system how much to remove from the end of the recording in order to remove the busy tone segment. This amount varies by system locale and the defaults are listed below. For some systems it may be necessary to override the default if analog call recordings are being clipped or include busy tone. That can be done by adding a VM_TRUNCATE_TIME= setting with a value from 0 to 7 seconds.
- New Zealand, Australia, China and Saudi Arabia: 5 seconds.
- Korea: 3 seconds.
- All other locales: 7 seconds.
SHOW_LINEID_NOT_OUTSIDE By default, for calls where no incoming caller ID (ICLID) information is available, the IP Office inserts the word “External” wherever ICLID information is normally displayed. The NoUser source number value SHOW_LINEID_NOT_OUTSIDE can be used to make available within the configuration for each trunk and channel Line Name and Channel Name fields. The text entered into those fields is then used with external calls without ICLID information.
- This feature is not used with SIP, IP DECT, E1R2 and S0 lines.
- On T1 lines, a Name field is also made available for individual channels and if set overrides the line name field.
- This feature does not override the display of Withheld if the caller has withheld their ICLID information.
- Where a Name is entered, that value is used to identify calls with no ICLID information.
- For line appearance buttons, if set the Name replaces the Line Appearance ID as the default button label.
How to create a self administrator button on the 54xx series phones with 6.0 or higher
I have made this FAQ because right now it is not very well documented how to create the self admin button on a 54xx phone with release 6.0
5.0 and lower had an option for “system phone” and you needed to make a button called “self administer” with value 1 or 2.
With 6.0 the option “system phone” is gone. There is a replacement option called “user phone level” with options: None, level 1 and level 2 None does nothing Level 1 and level 2 will do the same as self admin 1 and 2. With the exception of more options added in 6.0
For the 54xx phones you need to set the level you want but that is not enough. There is no option in the menu of the phone so you still can not use it. For the 54xx phones you still need to ad a self admin 2 button. A self admin 1 does not work.
With the self admin 2 button made you need to set the level you want to use (level 1 or level 2) Only then you have the admin rights on a 54xx phone. When you use 7.0 then you need to set “time setting config source” to None!
Turn Call Forward on and off for many users simultaneously with one button
With R5 and VMPro you can accomplish this task with relative ease. When complete you will have one short code that is dialed. This code will connect to a VMPro Module Start Point that has a Menu. Press Menu Option 1 to turn forward on or Menu Option 2 to turn forward off. Menu Option 1 and 2 is then connected to unique Generic Actions. One Generic Action for Forward on per user and one Generic Action for forward off per user. The actions are chained from the previous Generic Actions Next connector. So if the user selects to turn forward on then it is applied to each user one at a time. As long as a forward number is set per user then Forward Unconditional will be applied.
Dress it up by programming Forward All Buttons for each user. Record Menu wav that says something like ” Press 1 to turn Multi Forward On or press 2 to turn Multi Forward off”
SC: *75 (O.K. whatever)
Feature: Voicemail Collect
TN: “MultiForward”
LG: 0
VMPro Module: Build Module: MultiForward
Set each “Forward On” Generic Action to: Select Generic Command Change User or Group Configuration Set “User” (Choose the user you want forward applied to) Forward Unconditional 1
Set each “Forward Off” Generic Action to: Select Generic Command Change User or Group Configuration Set “User” (Choose the user you want forward applied to) Forward Unconditional 0
MultiForward Start Point → Menu Menu Touch Tone 1 → Generic Action(Forward On User 1) Next > Generic Action(Forward On User 2) Next > etc Menu Touch Tone 2 → Generic Action(Forward Off User 1) Next > Generic Action(Forward Off User 2) Next > etc
Бекап телефона
Now whilst we can backup & restore manually (in the advanced options menu) & restore takes place automatically on logging in a phone, I haven’t seen any obvious way of initiating an automatic backup. Indeed unplugging a phone then reconnecting rolls back the contacts to the last backup. (Before we got backup/restore working, the contacts would survive a logout/login or an unplug/reconnect, but not a login as another phone). Как сделать резервные копии списка контактов и логов. Если телефонами уже пользовались, можно сохранить бэкап, для чего в /tftpboot создаем каталог PhoneBackup и в файле настройки указываем ссылку на него SET BRURI http://x.x.x.x/PhoneBackup. Бэкап логов только с 3 релиза прошивки. Не работает для SIP-телефонов (проверить). В 46xxsettings.txt:
################# BACKUP/RESTORE SETTINGS ################
##
## Backup and Restore URI
## URI used for HTTP backup and retrieval of user data.
## Specify HTTP server and directory path to backup file.
## Do not specify backup file name.
## BRURI is not supported on 96xx or 16cc SIP phones.
SET BRURI http://192.168.0.28/PhoneBackup
##
SET BRAUTH 0
после этого перегрузиться, чтобы телефон подхватил настройку и тогда в меню “настройки телефона/Дополнит.параметры” появится пункт “резер/восстан”. там через “ручное резервирование” получишь в прописанной директории (в примере это PhoneBackup) появится файл типа <внутренний_номер_директора>_96xxdata.txt
если посмотришь внутрь файла, увидишь как правильно прописываются кнопочки и русские метки к ним.
теперь при перезагрузке телефона он всегда будет подтягивать это файл с метками. кстати в этом же файле хранится и адресная книга телефона, если директор ей пользуется. без подобного файла адресную книгу можно потерять и тогда директор будет в ярости…
Проблема 4624 телефона, firmware 2.8: в логе вместо номеров Unavailable. Надо заменить прошивку на 2.9 и выше.
Call Intrusion
Call intrusion allows a user to join another users existing conversation. Once the intrusion has occurred, all parties can hear and talk to each other. Note that intruding uses IP Office conference resources.The ability to intrude is controlled by two IP Office configuration settings, the Can Intrude (User | Telephony | Supervisor Settings) and the Cannot Be Intruded (User | Telephony | Supervisor Settings). By default no users can intrude and all users cannot be intruded.
Bridging
Users with call appearance buttons may be able to bridge into other calls. This is similar to intrusion but subject to different operation.
Privacy (IP Office 4.0+)
The system supports privacy features that allow a user to indicate that a call cannot be intruded on. See Private Calls.
Below is an example of a short code, which can be used to attempt call intrusion. Using it the intruder would dial *90*N#, replacing the N with the extension number of the user into whose call they need to intrude.
Short Code: *90*N#
Telephone No: N
Feature: CallIntrude
The Dial Inclusion short code feature can be used instead of Call Intrude. It allows the intruder and the intrusion target to talk without the third party hearing them. During this type of intrusion, all parties hear a repeated intrusion tone. When the intruder hangs-up the original call parties are reconnected.
Call Listen
This feature allows a user to monitor another user’s call without being heard. Monitoring is different from call intrusion. Note that this feature requires conference resources from the system for the duration of the intrusion.
WARNING Monitoring is not enabled by default. The use of monitoring is may be subject to local laws and regulations. Before enabling monitoring you must ensure that you have complied with all applicable local laws and regulations. Failure to do so may result in severe penalties
Monitoring can be accompanied by a tone heard by all parties. Use of the tone is controlled by the Beep on Listen setting on the System | Telephony | Tones & Music tab. The default for this setting is on. This is the only indication of monitoring, if enabled, given to the monitored user. There is no phone display indication of monitoring.
The use of call listen is dependant on: The target being a member of the group set as the user’s Monitor Group (User | Telephony | Supervisor Settings). The Can Intrude setting of the user listening and the Cannot be Intruded setting of the target. Monitoring is independent of the settings of the third party to the call if they are internal.
This feature uses system conference resources. If insufficient conference resource are available it will not be possible to use this feature. For IP Office 4.0+ a number of new features are supported for call listening: Users can be given privacy features that allow them to indicate that a call cannot be monitored. See Private Calls. IP extensions can be monitored including those using direct media. Previously the monitoring of IP extensions could not be guaranteed. The monitoring call can be initiated even if the target user is not currently on a call and remains active until the monitoring user clears the monitoring call. The user who initiated the call listen can also record the call. IP Office 4.2+: Intruding onto an a user doing silent monitoring (Call Listen) is turned into a silent monitoring call. 1400, 1600 and 9600 Series phones with a user button can initiate listening using that button if the target user meets the criteria for listening.
Telephone Number:  Target extension number (extension must be local).
Default Short Code:
Programmable Button Control:
Target extension number (extension must be local).
Default Short Code:
Programmable Button Control:  Listn
See also: Call Intrude, Dial Inclusion.
Software Level: 1.0+.
Listn
See also: Call Intrude, Dial Inclusion.
Software Level: 1.0+.
Пример Пользователь ‘Extn205’ хочет иметь возможность прослушивать (мониторить) звонки участников хант-группы ‘Sales’.
- Для пользователя ‘Extn205’, in the Monitor Group (User | Telephony | Supervisor Settings) выбрать из списка хант-группу, которую надо мониторить.
- На этой же вкладке убедиться в том, что пункт Can Intrude отмечен галочкой.
- Создать Sort Code, чтобы разрешить пользователю Extn205 начать мониторинг
     Short Code: *99*N#
     Telephone Number: N
     Line Group ID: 0
     Feature: CallListen
- Вместо Short Code можно назначить кнопку User с номером абонента или кнопку Advanced→ Call→ Call Intrude
- У каждого участника хант-группы в пункте Cannot be Intruded снять галочку, чтобы его можно было прослушать. Если же кого-то не надо прослушивать, галочку оставить.
- Теперь, когда один из участников группы разговаривает, абонент Extn205 набирает
*99*N#, где N — номер абонента.
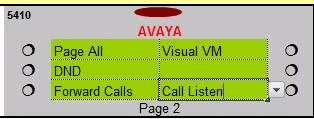
Пример из той же оперы. In this example we will program the IP Office to allow extension 1152 to listen to (Call Listen) extension 1153. While we will focus on the Call Listen feature in this example the programming for Call Intrude is identical with the exception of the button programmed to perform the Listen/Intrude action.
Call Listen: allows one user to listen in on another user’s call but does not allow that user to be an active participant. This is a “listen only” feature. Call Intrude: allows one user to intrude on another user’s call thus becoming a full participant in the conversation. The use of the MUTE feature can make this a listen only action however the intruding party can fully participate in the voice conversation at any time.
-
In Manager create a new Hunt Group that contains all members that will be part of the monitoring process. In this example we will include 1152 and 1153. Disable querying and voicemail for this hunt group.
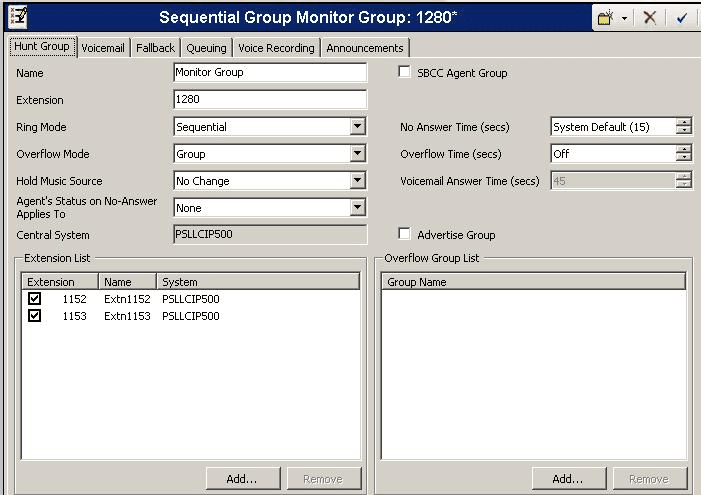
-
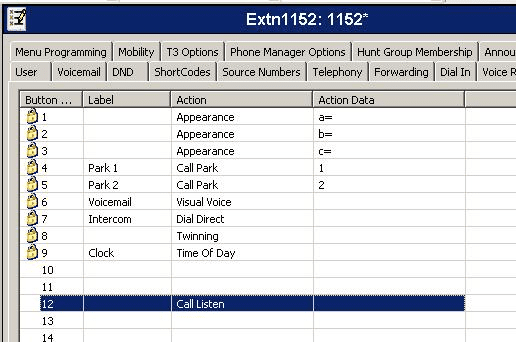
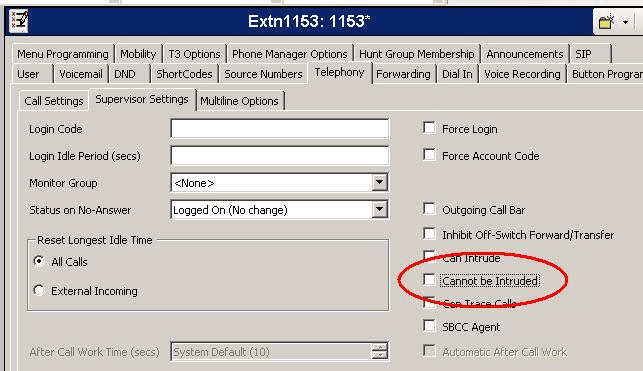
On the user that will initiate the Call Listen (in this example 1152) select the Telephony→Supervisor Settings tab. Enable both “Can Intrude” and, assuming that this person should be exempt from having other users listen in on their conversation, also select “Cannot be Intruded”

-
On the same user (1152 in this example) select Button Programming and program a button for Advanced→Call→Call Listen. Leave the Action Data field empty and optionally assign it a Label such as “Listen to”. (NOTE: Alternatively you could program the button as Advanced>Call>Call Intrude.)
-
On the user that will be listened to (in this example 1153) select the Telephony>Supervisor Settings tab. Disable “Cannot be Intruded” and, assuming this user should not have the ability to listen to other’s calls, also disable “Can Intrude”.
-
Save the configuration in Manager
-
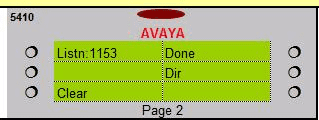
On the initiating extension (1152 in this example) select the newly programmed Call Listen button
-
Enter the extension of the user you will monitor (1153 in this example) and select Done.
Dial InclusionThis feature intrudes on the existing call of the specified target extension. The intruder and the target extension can then talk but cannot be heard by the other party. This can include intruding into a conference call, where the conference will continue without the intrusion target.
During the intrusion all parties hear a repeated intrusion tone. When the intruder hangs-up the original call parties are reconnected.
Use of this feature is subject to the Can Intrude status (configured in Manager via the User form’s Telephony tab) of the intruder and the target extension (the extension to be intruded upon).
Attempting to hold a dial inclusion call simply ends the intrusion part of the call. The inclusion cannot be parked.
Telephone Number:  Target extension number
Default Short Code:
Programmable Button Control: Inclu.
See also: Call Intrude
Software Level: 1.4+.
Target extension number
Default Short Code:
Programmable Button Control: Inclu.
See also: Call Intrude
Software Level: 1.4+.
Пример.
N represents the extension to be intruded upon. For example, if a user dials *97*201# while extension 201 is on a call, then the user is intruding into extn. 201’s current call.
Short Code: *97*N#
Telephone Number: N
Feature: DialInclusion
Editing an IP Office configuration in Excel
Many items in your IP Office configuration can be edited directly in the configuration.csv file outside of the Manager application saving a large amount of time. This guide will provide basic information on how to export your configuraiton.csv and edit select User information. Until you are comfortable with this method I would suggest that you limit its use to a lab environment
Note: You MUST NOT add nor delete any records when using this method. (i.e. you cannot add/delete an extension, user, incoming call route). You must create all records in Manager before doing your Export. You can then modify the information associated with that record using the method below.
Example of changing your Users In Manager select File→Import/Export→Export Select УConfiguration All of the Configuration and click OK Open the Configuration.csv in Excel Delete all rows up to УUser_Info_Start Delete all rows after УUser_Info_End
You can now modify your columns as needed. Most of the columns headers are self explanatory but here are the ones that you will change most often.
| US_Name | Username (15 characters maximum) |
| US_Fullname | Full Name |
| US_Password | Application (i.e. Phone Manager) password (This field is encrypted in 4.2 so set it in manager for one user to say 1234 then copy past to other users) |
| US_Extension | Extension Number |
| US_ForwardOnBusy | Forward on Busy TRUE/FALSE - Requires entry in US_ForwardBusyNumber |
| US_ForwardonNoAnswer | Forward on No Answer TRUE/FALSE - Requires entry in US_ForwardBusyNumber |
| US_ForwardUnconditional | Forward Unconditional TRUE/FALSE - Requires entry in US_ForwardNumber |
| US_ForwardNumber | Forwarding Number for US_ForwardUnditional (Call Forward Unconditional) |
| US_FOrwardBusyNumber | Forwarding Number for USForwardOnBusy US_ForwardOnNoAnswer |
| US_DoNotDistrub | Do Not Disturb TRUE/FALSE |
| US_VoiceMailEmail | Email address for voicemail to email |
| US_VoiceMailReception | 0 DTMF Breakout (personal operator) |
| US_VoiceMailEmailMode | 0=Off, 1=Copy, 2=Forward, 3=Alert |
| US_ShortCodes | EDITING THIS FIELD IS NOT SUGGESTED. |
| US_DialInSourceNumbers | Source Numbers. (e.g. V201|H200| NOTE: Must end with | ) |
| US_LoginCode | Hot Desk login code (This field is encrypted in 4.2 so set it in manager for one user to say 1234 then copy past to other users) |
| US_ExDirectory | Exclude from directory 0=No, 1=Yes/Exclude |
| US_ForceLogin | Enable Force Login |
| US_Right | User Rights profile name |
| US_BusyOnHeld | Busy on Held TRUE/FALSE (No more annoying Clear ‘Busy On Held’ for this user? prompts) |
| US_AnswerPreSelect | Enable Answer Preselect TRUE/FALSE |
| US_ReserveLastCA | Enable Reserve Last CA TRUE/FALSE |
| After making your changes you will save the spreadsheet as a .csv. Excel should give you an error УConfiguration.csv may contain features that are not compatible with CSVЕФ this is normal. Say YES to keep the .csv format and leave out the incompatible features. |
Open the document in Notepad. You will notice that the УUser_Info_StartФ and УUser_Info_EndФ lines have a series of trailing commas (e.g. User_Info_Start,,,,,,,,,,,,,,,,,,,,,,,,,,,,,,,,,,,,,,,,,,,,,,,,,,,,,,,,,,,,,,,,,,,,,,,,,,,,,,,,,,,,,,,,,,,,,,,,,,,,,,,,,,,,) Delete all of the commas from these two lines and save the file.
In Manager select File→Import/Export→Import to import the new changes.
You’ll note that the actual changes that are applied by the User Rights may not show up properly at this point. Simply save the configuration and re-open it in Manager.
This method is especially helpful in changing Extension ID for IP extensions, adding incoming call routes that are out of sequence, etc. Just remember that you will need to create the extension, incoming call route, etc. in Manager before you export and then modify the entry in the .csv.
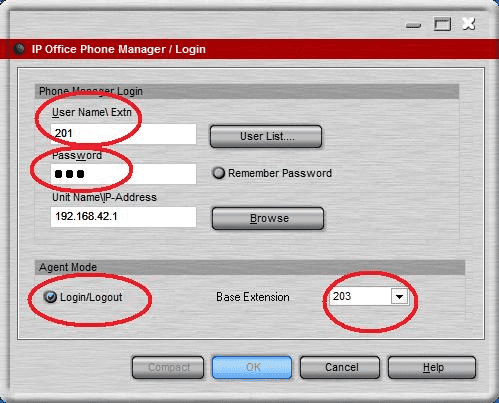
HOWTO: Use a singe user for multiple devices
(IP Soft Phone, Hard Phones, Digital extension)
| Users: | |
|---|---|
| User Name: | Test Extension |
| Extension: | 201 |
| Password: | 201 |
| Forced Login: | Either |
| Login Code: | 201 |
| Phone Manager: | PC Softphone |
| Extensions: | |
|---|---|
| 201 | IP Extension (used for softphone’s “base extension”) |
| 202 | IP Extension (used for IP hardphone’s “base extension”) |
| 203 | Digital extension (used for Digital phones “base extension”) |
| NOTE: No “user” need be created for 202 nor 203. The digital phone will show “NoUser” without an extension. The IP hardphone will show NoUser 202. | |
| NOTE: You must use Phone Manager to login each device as with IPO 4.0+ you can not use a short code to login a phone that does not have a Login Code assigned. |
TEST: To use your PC Softphone launch Phone Manager and enter 201 as your user/password and base extension.
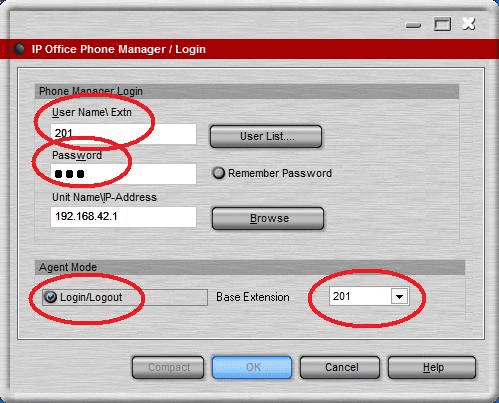
TEST: To use your IP Hardphone launch Phone Manager and enter 201 as your user/password but use 202 as your base extension.
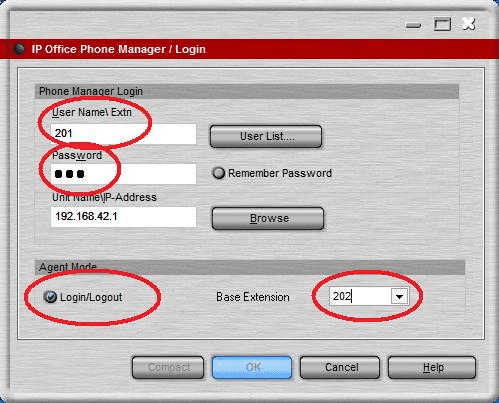
TEST: To use your Digital phone launch Phone Manager and enter 201 as your user/password but use 203 as your base extension.
Create a remote access menu
- Download and extract the pre-configured module and associated .wav files
- Copy the .wav files to x:\Program Files\Avaya\IP Office\Voicemail Pro\VM\WAVS\yyy\Custom (where x=the drive where VMP is installed and yyy=your locale, such as enu)
- Import the module contained in the menuRemote.mod file into your current Voicemail Pro configuration.
- Click on the Save & Make Live icon in Voicemail Pro to save the current configuration.
- Using Manager create an Incoming call Route to point a DID to VM:menuRemote (or create an option off of your Voicemail Pro auto attendant to point to the menuRemote module.)
- Save your configurations changes in Manager and test your DID or AA option.
Enable application dialing without a 9 prefix
In this document we will program ARS and User Rights to allow applications (i.e. Phone Manager) to be used to return calls without the need to use the “9” prefix in the IP Office. This eliminates the issues with screen pop in applications where the 9 prefix would impact the TAPI lookup causing a failure to match the number field in the application.
We will start by creating an ARS table. ARS will be activated by several User Rights short codes. The combination of short codes activated can be somewhat complex. For example, the 9N User Rights short code can activate several ARS short codes depending on the total number of digits dialed. 9N followed by 9 other digits (i.e. 9495551212) would activate 9N User Rights and 4XXXXXXXX; ARS which would dial 19495551212 as the telephone number. This is because the 9 is stripped off by the User Rights short code and 4XXXXXXXX is then passed on to the ARS table. ARS will then add back on to the front of the number a 19 resulting in 19495551212. If this all seems to complex to understand don’t worry, it just works so program away and you’ll be fine. Please keep in mind that this is not my way of allowing you to bypass dialing a 9 to make phone calls, although that is a potential side effect. This solution will only work 100% for applications that deliver information to the IP Office en bloc where the system can look at the entire number rather than one dialed digit at a time. Therefor users trying to use this method to bypass dialing a 9 may have success so long as their internal numbering plan does not overlap any external telephone numbers. You’ll also notice that at least one of these short codes is completely superfluous (1XXXXXXXXXX), in that the User Rights short code 1XXXXXXXXXX delivers N, thus stripping the 1 off before sending to ARS, you would never receive 1XXXXXXXXXX in ARS. I know it doesn’t need to be there but it just looks perdy so dangit I put it in there (I just blame it on the OCD).
ARS Short Codes:
| Code | Telephone Number | Feature | Line Group ID |
|---|---|---|---|
| 11 | 911 | Dial Emergency | 0 (or appropriate ID) |
| 911 | 911 | Dial Emergency | 0 |
| 0XXXXXXXX; | 190N | Dial 3K1 | 0 |
| 1XXXXXXXX; | 191N | Dial 3K1 | 0 |
| 2XXXXXXXX; | 192N | Dial 3K1 | 0 |
| 3XXXXXXXX; | 193N | Dial 3K1 | 0 |
| 4XXXXXXXX; | 194N | Dial 3K1 | 0 |
| 5XXXXXXXX; | 195N | Dial 3K1 | 0 |
| 6XXXXXXXX; | 196N | Dial 3K1 | 0 |
| 7XXXXXXXX; | 197N | Dial 3K1 | 0 |
| 8XXXXXXXX; | 198N | Dial 3K1 | 0 |
| XXXXXXXXXX; | 1N | Dial 3K1 | 0 |
| 1XXXXXXXXXX; | 1N | Dial 3K1 | 0 |
| N; | N | Dial 3K1 | 0 |
Special ARS considerations for local calling where all 10 digits are required (e.g. 303 in Denver Colorado)
| Code | Telephone Number | Feature | Line Group ID |
|---|---|---|---|
| 303XXXXXXX | 303N | Dial 3K1 | 0 |
| 1303XXXXXXX | 303N | Dial 3K1 | 0 |
Special ARS considerations for local calling where only 7 digits are required for local (e.g. 805 in Ventura California)
| Code | Telephone Number | Feature | Line Group ID |
|---|---|---|---|
| 805XXXXXXX | N | Dial 3K1 | 0 |
| 1805XXXXXXX | N | Dial 3K1 | 0 |
Special ARS considerations for area codes that begin with a 9 in 7 digit dialing areas (e.g. 949)
| Code | Telephone Number | Feature | Line Group ID |
|---|---|---|---|
| 949XXXXXXX; | N | Dial 3K1 | 0 |
| 49XXXXXXX; | N | Dial 3K1 | 0 |
Special ARS considerations for area codes that begin with a 9 in 10 digit dialing areas
| Code | Telephone Number | Feature | Line Group ID |
|---|---|---|---|
| 907XXXXXXX; | 907N | Dial 3K1 | 0 |
| 07XXXXXXX; | 907N | Dial 3K1 | 0 |
Your ARS table will look something like this
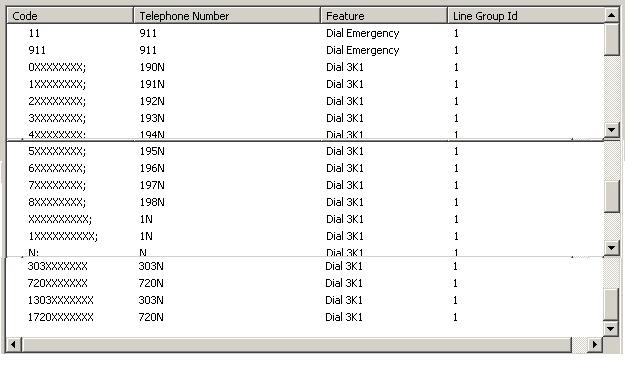
Now that we have our ARS table in place we can assign our User Rights or User short codes. The 9N here should be obvious to anyone who has ever touched an IP Office. We don’t need a 1XXXXXXXXX because no US telephone NPA (area code) start with a 1. The 9N serves as both the 9XXXXXXXXX and the 9N and if you were to use 9XXXXXXXXX instead you wouldn’t hear secondary dial tone. 1XXXXXXXXXX really isn’t needed but again it is perdy so I leave it in just to make me happy. Additionally if you were using Outlook to place calls and your Modem properties were setup to add a 1 for long distance calls this would allow the system to strip that off and have the IP Office add its own dialing treatment.
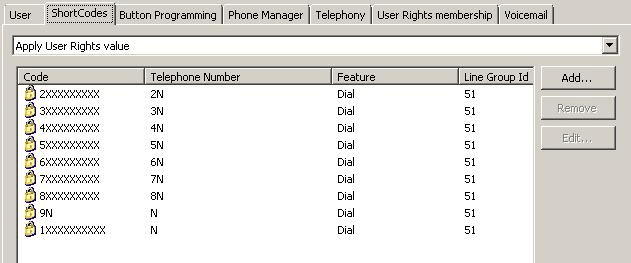
User Rights Short Codes:
| Code | Telephone Number | Feature | Line Group ID |
|---|---|---|---|
| 2XXXXXXXXX | 2N | Dial | XX (e.g. 50: Main) |
| 3XXXXXXXXX | 3N | Dial | XX (e.g. 50: Main) |
| 4XXXXXXXXX | 4N | Dial | XX (e.g. 50: Main) |
| 5XXXXXXXXX | 5N | Dial | XX (e.g. 50: Main) |
| 6XXXXXXXXX | 6N | Dial | XX (e.g. 50: Main) |
| 7XXXXXXXXX | 7N | Dial | XX (e.g. 50: Main) |
| 8XXXXXXXXX | 8N | Dial | XX (e.g. 50: Main) |
| 9N | N | Dial | XX (e.g. 50: Main) |
| 1XXXXXXXXXX | N | Dial | XX (e.g. 50: Main) |
Your User Rights short codes will look something like this
Route calls to day or night AA using a button on a phone
This example with how enable a day or night auto attendant using a button on a phone.
-
Create a new hunt group that will be used soley for the purpose of routing your calls to the day or night auto attendant. Because some older versions of IP Office had issues with hunt groups having no members I would suggest adding a single user but disabling them from the group. Enable Voicemail for the hunt group, disable Queuing and set the Voicemail Answer Time to 1 second.

-
Create or modify your incoming call route to point to the hunt group created in step 1
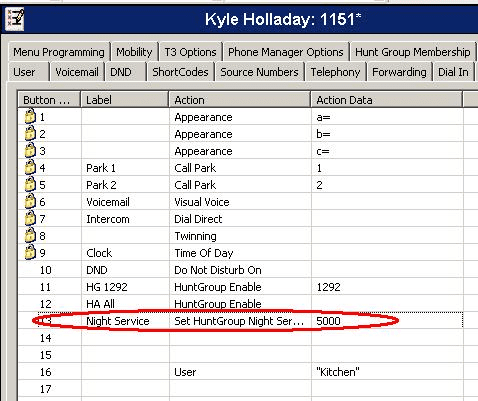
3. Assign a button to a user/users allowing them to select the night service mode by setting the hunt group created in step 1 to Night Service
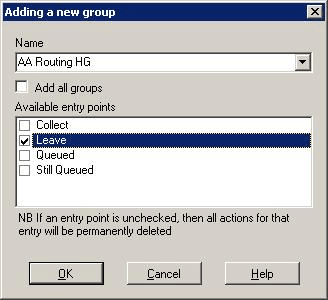
4. In Voicemail Pro right click on Groups and select Add. Locate the hunt group created in step 1 from the drop down list and click on the “Leave” option
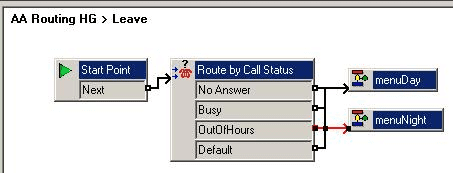
5. Add a Route by Call Status action under the blue telephone icon then connect all actions except OutofHours to your day auto attendant. Then connect the OutofHours action to your night auto attendant. (You can also route either of these to any other action such as a transfer to a receptionist hunt group.
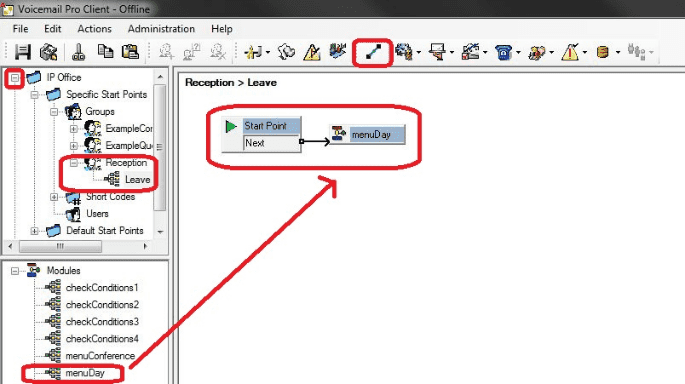
Route calls to an Automated Attendant after ringing a user or hunt group (VMP) In this guide I will provide simple instructions for routing a call to an automated attendant after ringing a user or hunt group in Voicemail Pro. Note: In Manager you simple need to insure that you have voicemail enabled for the group or user. No additional programming is needed.
- In the Voicemail Pro client expand out your configuration by clicking the [+] in the upper left corner of the screen to reveal Groups, Short Codes and Users.
- Select either Groups or Users depending on your need and right click to access the menu.
- Click on Add
- Use the drop down to locate the name of the group or user from the list and then select the Leave entry point. Then click OK.
- Locate the new Leave action in the tree under the group or user entity that you just added and click on it.
- Drag and drop your already created Automated Attendant from Modules in the lower left corner to the empty area next to the Start Point.
- Use the connector tool to draw a line between the Start Point and the module representation you just dropped into the call flow pane.
- Click the Save & Make Live icon to apply your changes. You can now adjust the number of rings before the call reaches this Automated Attendant by adjusting the No Answer time of the user on their Telephony or or the Voicemail Answer time of the group on the primary group tab.