Установка почтового сервера Zimbra, защита от спама
Некоторые почтовые серверы: https://github.com/timeweb/rebrain-exim — конфигурационные файлы Exim, Dovecot, RoundCube, Apache2 и Nginx с помощью которых можно настроить полноценный почтовый стек MTA Exim+MDA Dovecot c RoundCube в качестве веб-интерфейса в Ubuntu 20.04 для domain.tld, где вместо domain.tld необходимо использовать желаемое доменное имя. Тут про RoundCube. iRedMail - Open Source Mail Server Solution — обязательно почитать https://www.rainloop.net/try-now/ https://gitlab.com/simple-nixos-mailserver/nixos-mailserver mailCow Modoboa — Open Source email server Mail-in-a-Box lets you become your own mail service provider in a few easy steps. It’s sort of like making your own gmail, but one you control from top to bottom. Postal is a complete and fully featured mail server for use by websites & web servers. Think Sendgrid, Mailgun or Postmark but open source and ready for you to run on your own servers. Postal is developed by Krystal to serve its own mail processing requirements and we have since decided that it should be released as an open source project for the community. poste.io — есть бесплатная и платная версии.
Установка Zimbra в облаке mail.ru. Общее.
postfix + dovecot + PostgreSQL + SpamAssassin + greylist + RoundCube + RainLoop… Ну и еще по мелочи, включая сито, DKIM, и что-то еще. Zimbra + Zextras Suite
Общие данные:
SERVER IP: l2tp.quadra.ru
IPSEC PSK: ТутПароль

Пользователь zextras
Пароль ТутПароль
Заведено 3 виртуальные машины (инстансы). На каждой добавлены ssd (диск /dev/sdb) для swap по рекомендации Zextras. Вход: через сертификат (скачать можно на mail.ru), везде заведен пользователь loki со стандартным паролем, но чаще всего отключаю вход по логину, оставляю только по ключу (скачать из веб-интерфейчас mail.ru). Временно логин: zextras/Test2019zzzz
- 10.112.203.25 turn.quadra.ru
- 10.112.203.29 zmail.quadra.ru
- 10.112.203.21 zdocs.quadra.ru
Веб-интерфейс администратора: https://zmail.quadra.ru:7071/zimbraAdmin/ логин zextras@zmail.quadra.ru, пароль Test2019zzzz логин admin@zmail.quadra.ru или просто admin? пароль как от loki, но первая и пятая буквы заглавные.
Веб-интерфейс своей учетной записи: https://zmail.quadra.ru/ Руководство администратора: https://zimbra.github.io/adminguide/8.8.15/index.html
| Доменное имя | eth1 | eth0 | Софт | Примечание |
|---|---|---|---|---|
| zturn.quadra.ru | 89.208.221.15 - MX-запись и A-запись zmail.quadra.ru 89.208.221.15 - A-запись zturn.quadra.ru (для zmail.quadra.ru) | 10.112.203.25 Внутри turn.quadra.ru | resiprocate-turn-server (стандартный пакет) | средствами firewalld проброшены порты Zimbra на zmail.quadra.ru c внешнего интерфейса eth1 |
| zmail.quadra.ru | нет, сюда проброшены порты | 10.112.203.29 Внутри zmail.quadra.ru | zcs-8.8.15_GA_3869.RHEL7_64.20190918004220.tar zextras_suite-latest.tgz | связан с zturn.quadra.ru |
| zdocs.quadra.ru | нет | 10.112.203.21 Внутри zdocs.quadra.ru | zextras-docs-centos7.tgz | связан с LDAP на zmail.quadra.ru |
Добавить: дополнительный диск для почты на mail сервере. ZCS — Zimbra Collaboration Suite. На инстансы добавлены репозитории EPEL, Remi, CodeIT и репозиторий свежей версии MariaDB.
yum install epel-release https://centos7.iuscommunity.org/ius-release.rpm http://rpms.famillecollet.com/enterprise/remi-release-7.rpm
cd /etc/yum.repos.d
wget https://repo.codeit.guru/codeit.el`rpm -q --qf "%{VERSION}" $(rpm -q --whatprovides redhat-release)`.repo
Zimbra-TURN
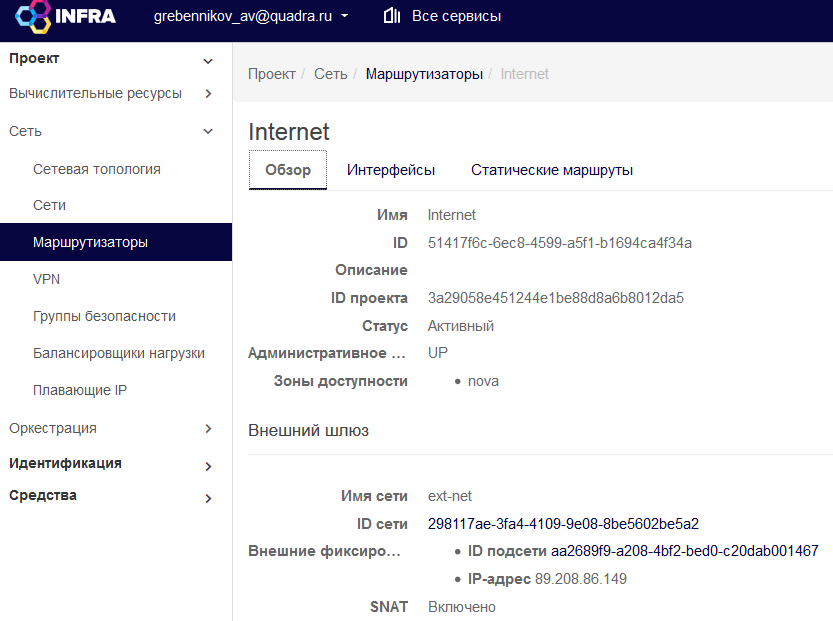
Доменное имя zturn.quadra.ru. Внешний «белый» ip на eth1 (89.208.221.15 → zmail.quadra.ru прописана MX запись в nic.ru) и внутренний ip на eth0 (10.112.203.25):
[root@mx3 centos]# hostname
mx3.quadra.ru
[root@mx3 centos]# ip a

1: lo: <LOOPBACK,UP,LOWER_UP> mtu 65536 qdisc noqueue state UNKNOWN group default qlen 1000
 link/loopback 00:00:00:00:00:00 brd 00:00:00:00:00:00
 inet 127.0.0.1/8 scope host lo
 valid_lft forever preferred_lft forever
 inet6 ::1/128 scope host
 valid_lft forever preferred_lft forever

2: eth0: <BROADCAST,MULTICAST,UP,LOWER_UP> mtu 1450 qdisc pfifo_fast state UP group default qlen 1000
 link/ether fa:16:3e:bc:2c:0d brd ff:ff:ff:ff:ff:ff
 inet 10.112.203.25/24 brd 10.112.203.255 scope global dynamic eth0
 valid_lft 603994sec preferred_lft 603994sec
 inet6 fe80::f816:3eff:febc:2c0d/64 scope link
 valid_lft forever preferred_lft forever

3: eth1: <BROADCAST,MULTICAST,UP,LOWER_UP> mtu 1450 qdisc pfifo_fast state UP group default qlen 1000
 link/ether fa:16:3e:ee:f9:77 brd ff:ff:ff:ff:ff:ff
 inet 89.208.221.15/22 brd 89.208.223.255 scope global eth1
 valid_lft forever preferred_lft forever
 inet6 fe80::f816:3eff:feee:f977/64 scope link
 valid_lft forever preferred_lft forever
Настройка работы двух сетевых интерфейсов. Временные правила до перезагрузки сервера (только для проверки).
Дополнительно, но здесь не нужно. По умолчанию после добавления второго интерфейса eth1 с внешним (белым) ip-адресом маршрут по умолчанию через eth1:
# ip route show
default via 89.208.223.254 dev eth1
...
Но в таком случае у нас не работает маршрутизация внутри сети предприятия. Добавляем маршрут на 10.0.0.0/8 через программный шлюз OpenStack 10.112.203.250, куда попадаем через интерфейс eth0:
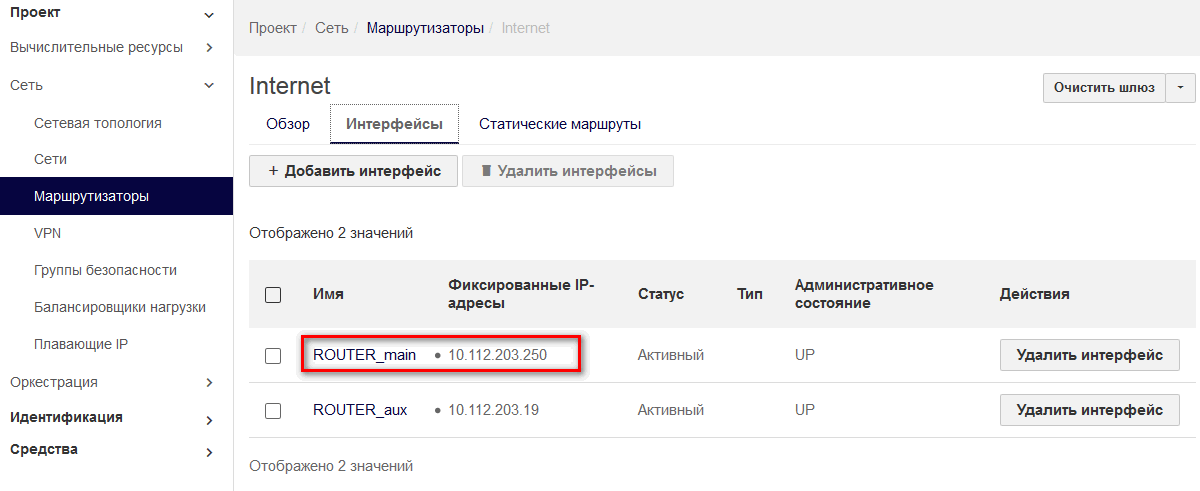
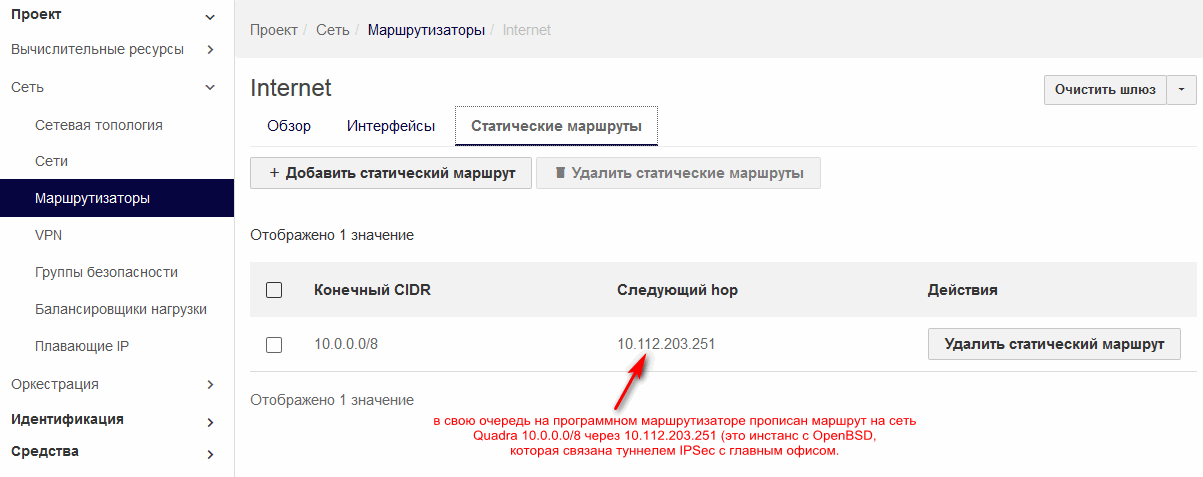
ip route 10.0.0.0/8 via 10.112.203.250 dev eth0Программный маршрутизатор 10.112.203.250 был заранее заведен в веб-интерфейсе Mail.Ru (OpenStack). И на нем в свою очередь прописан статический маршрут на сеть Quadra 10.0.0.0/8 через инстанс (виртуальную машину) с OpenBSD, которая связана с такой же OpenBSD в офисе шифрованным туннелем IPSec.
Проверим правила маршрутизации и таблицы маршрутизации:
[root@mx3 centos]# ip r
default via 89.208.223.254 dev eth1
10.0.0.0/8 via 10.112.203.250 dev eth0
10.112.203.0/24 dev eth0 proto kernel scope link src 10.112.203.25
89.208.220.0/22 dev eth1 proto kernel scope link src 89.208.221.15
169.254.0.0/16 dev eth0 scope link metric 1002
169.254.0.0/16 dev eth1 scope link metric 1003
169.254.169.254 via 10.112.203.250 dev eth0 proto static

[root@mx3 centos]# ip route show table table-local
default via 10.112.203.250 dev eth0

[root@mx3 centos]# ip route show table table-ext
default via 89.208.223.254 dev eth1
Warning
Все эти правила временные и могут быть использованы для теста, но после перезагрузки Linux они «обнулятся».
Настройка работы двух сетевых интерфейсов. Постоянные правила.
При добавлении маршрутов в конфигурационные файлы из каталог /etc/sysconfig/network-scripts опции dev eth0 и dev eth1 можно пропустить.
vim /etc/sysconfig/network-scripts/route-eth0
10/8 10.112.203.250
По умолчанию DEFROUTE не прописан для интерфейсов, «закрепим» дефолтный маршрут за одним из интерфейсов. eth0 не является дефолтным. Адрес оставляем dhcp — он выдается при создании виртуальной машины (инстанса) в OpenStack и там же закрепляется на ней. Зоны в принципе можно не описывать. Они нужны, если используем файрвол firewalld вместо iptables.
# Created by cloud-init on instance boot automatically, do not edit.
#
BOOTPROTO=dhcp
DEVICE=eth0
HWADDR=fa:16:3e:bc:2c:0d
ONBOOT=yes
TYPE=Ethernet
USERCTL=no
DEFROUTE=no           # не является сетевым интерфейсом по умолчанию
ZONE=public
Настраиваем правила для eth1:
# vim /etc/sysconfig/network-scripts/route-eth1
default via 89.208.223.254
Чтобы основной маршрут убрать на eth1 (иначе все равно настройка для eth0 не поможет), eth1 выбран в качестве дефолтного. Данные по ip адресу, маске и шлюзу выданы в mail.ru. В качестве DNS используются сервера Google.
.....
BOOTPROTO=static
DEVICE=eth1
HWADDR=fa:16:3e:ee:f9:77
ONBOOT=yes
TYPE=Ethernet
USERCTL=no
IPADDR=89.208.221.15
NETMASK=255.255.252.0
GATEWAY=89.208.223.254
DNS1=8.8.8.8
DNS2=8.8.4.4
MTU=1450
DEFROUTE=yes  - интерфейс eth1 с «белым» ip-адресом является дефолтным
ZONE=external
Список портов Zimbra
Жирным выделено то что надо открыть для внешних соединений, 389 порт например использует zdocs.quadra.ru, но открывать его надо только на zmail.quadra.ru, не нужно пробрасывать порты с внешнего ip — открытый порт для доступа к LDAP, является угрозой для информационной безопасности предприятия! Опционально — выделено курсивом.
Стандартный набор портов: 25, 80, 110, 143, 443, 465, 587, 993, 995, 3443, 5222, 5223, 7071, 9071. Что за порты 465, 3443?
| Сервис | порт | TCP/UDP | Примечание |
|---|---|---|---|
| SMTP | 25 | tcp | Публичный. Входящая почта в postfix. |
| HTTP | 80 | tcp | Незащищенное подключение к веб-клиенту Zimbra. Для безопасности ограничить файрволом только для локальной сети, не пробрасывать с внешнего ip |
| POP3 | 110 | tcp | Получение почты с удаленного сервера по протоколу POP3. Для безопасности ограничить файрволом только для локальной сети, не пробрасывать с внешнего ip. |
| IMAP | 143 | tcp | Доступ к электронной почте по протоколу IMAP. Для безопасности ограничить файрволом только для локальной сети, не пробрасывать с внешнего ip |
| LDAP | 389 | tcp | Незащищенное подключение к LDAP. Для безопасности ограничить файрволом только для локальной сети, не пробрасывать с внешнего ip |
| HTTPS | 443 | tcp | Публичный. Защищенное подключение к веб-клиенту Zimbra |
| SMTPS | 465 | tcp | Публичный |
| SMTP Submission | 587 | tcp | Публичный. Входящая почта с защитой соединения |
| LDAP | 689 | tcp | Защищенное подключение к LDAP |
| IMAPS | 993 | tcp | Публичный. Защищенный доступ к электронной почте по протоколу IMAP |
| POP3S | 995 | tcp | Публичный. Защищенное получение почты с удалённого сервера по протоколу POP3 |
| 3310 | tcp | Подключение к антивирусу ClamAV | |
| XMPP | 5222 | tcp | Подключение к серверу по протоколу xmpp |
| XMPP | 5223 | tcp | Защищенное подключение к серверу по протоколу xmpp |
| 5269 | tcp | Общение между серверами, находящимися в одном кластере, по протоколу XMPP | |
| Admin Interface | 7071 | tcp | Стандартное подключение к консоли администратора. Для безопасности ограничить файрволом только для локальной сети, не пробрасывать с внешнего ip |
| 7072 | Обнаружение и аутентификация в nginx | ||
| SOAP Auth | 7073 | tcp | Обнаружение и аутентификация в SASL. Для безопасности ограничить файрволом только для локальной сети, не пробрасывать с внешнего ip. |
| LMTP | 7025 | tcp | Локальный обмена почтой по протоколу LMTP. Для безопасности ограничить файрволом только для локальной сети, не пробрасывать с внешнего ip |
| 7047 | Используется сервером для конвертирования вложений | ||
| 7110 | Доступ к внутренним службам POP3 | ||
| 7143 | Доступ к внутренним службам IMAP | ||
| 7171 | Доступ к демону конфигурации Zimbra zmconfigd | ||
| 7306 | доступ к MySQL | ||
| 7780 | доступ к службе проверки правописания | ||
| 7993 | Защищенный доступа к внутренним службам IMAP | ||
| 7995 | Защищенный доступ к внутренним службам POP3 | ||
| 8080 | Доступ к внутренним службам HTTP | ||
| 8443 | Доступ к внутренним службам HTTPS | ||
| 8735 | Общение между почтовыми ящиками | ||
| 8736 | Доступ к службе распределенной настройки Zextras | ||
| 10024 | Общение Amavis с Postfix | ||
| 10025 | Общение Amavis с OpenDKIM | ||
| 10026 | Настройка политик Amavis | ||
| 10028 | Общение Amavis с фильтром контента | ||
| 10029 | Доступ к архивам Postfix | ||
| 10032 | Общение Amavis со спам-фильтром SpamAssassin | ||
| 23232 | Доступ к внутренним службам Amavis | ||
| 23233 | доступ к snmp-responder | ||
| 11211 | доступа к memcached. Задействован в популярной разновидности кибератак memcrashd. wiki.zimbra.com/wiki/Blocking_Memcached_Attack | ||
| Admin Interface ??? | 9071 | tcp | Защищенное подключение к консоли администратора ???? не совсем то что 7071 |
Порты кластера Zimbra. Ограничить файрволом только для локальной сети. Поддержка кластера завершена в версии ZCS7, для более поздних версий ZCS можно проигнорировать.
- rgmanager
- port 41966/tcp
- port 41967/tcp
- port 41968/tcp
- port 41969/tcp
- ccsd
- port 50006/tcp
- port 50007udp
- port 50008/tcp
- port 50009/tcp
- dlm
- port 21064/tcp
- cman
- port 6809/udp
- gnbd
- port 14567/tcp
Проброс портов. 1. Включение транзитного трафика.
Проверим, включено ли пробрасывание (переадресация) портов. Если возвращает 0, то выключено. Если 1, то включено.
sysctl net.ipv4.ip_forwardили
cat /proc/sys/net/ipv4/ip_forwardВключить пробрасывание портов для текущей сессии, действует только до перезагрузки Linux:
sysctl -w net.ipv4.ip_forward=1Включить пробрасывание портов на постоянной основе. vim /etc/sysctl.conf:
net.ipv4.ip_forward = 1Вариант 2 — не заходить в текстовый редактор vim, а добавить строку внизу (если таковой в файле еще не было).
echo net.ipv4.ip_forward=1 >> /etc/sysctl.confЕсли мы ранее не включали проброс для текущей сессии, то применим правила из /etc/sysctl.conf. После применения отобразятся правила из файла, которые вступили в силу.
# sysctl -p
net.ipv4.ip_forward = 1
Проброс портов. 2. Настройка файрвола firewalld.
Выключаем все сервисы, которые относятся к iptables:
systemctl disable --now iptables
systemctl mask iptables
systemctl mask ip6tables
systemctl mask ebtables
Установим firewalld и включим его:
yum install firewalld
systemctl enable --now firewalld
По умолчанию все сетевые интерфейсы принадлежат той зоне, которая у нас основная, т.е. public:
firewall-cmd --get-active-zonesУ меня команда ничего не показала. Это значит, что все равно интерфейсы eth0 и eth1 в зоне public. Но мы явно укажем, что зона по умолчанию — public. Это значит, что если будем прописывать правила без указания зоны, они будут относиться к public. Переносим интерфейс eth1 во внешнюю зону external, eth0 останется в public.
firewall-cmd --set-default-zone=public

firewall-cmd --permanent --change-interface=eth1 --zone=external
firewall-cmd --permanent --change-interface=eth0 --zone=public
Проверка соответствия интерфейсов и зон после изменения:
[root@zturn loki]# firewall-cmd --get-active-zones
external
interfaces: eth1
public
interfaces: eth0
Дополнительно пропишем в конфигурационных файлах сетевых интерфейсов их зоны (см. выше скрины настроек сетевых интерфейсов, где указаны параметры ZONE=external и ZONE=public).
Для внешней зоны удалим сервис ssh, чтобы хакеры не ломились на порт 22 по белому ip-адресу, и пробросим какой-нибудь произвольный не используемый порт (здесь 47600) на порт 22 на случай, если понадобится удаленный доступ к ssh.
firewall-cmd --permanent --zone=external --remove-service=ssh
firewall-cmd --permanent --zone=external --add-forward-port=port=47600:proto=tcp:toport=22
Пробросим порты, которые используются сервером Zimbra, на адрес 10.112.203.29 (доменное имя zmail.quadra.ru), куда установлены Zimbra Collaboration Suite и Zextras Suite.
Примечание
Порт администрирования 7071 можем пробросим извне ТОЛЬКО для тестирования, чтобы потом не было лишних возможностей для хакеров. Порт 389 (LDAP) никогда снаружи не открываем.
firewall-cmd --permanent --zone=external --add-port-forward=port={25,80,110,143,443,465,587,993,995,**~~7071~~**,7073,7075,5222,5223,9071}:proto=tcp:toaddr=10.112.203.29Пример удаления порта:
firewall-cmd --permanent --zone=external --remove-forward-port=port=7071:proto=tcp:toport=:toaddr=10.112.203.29По умолчанию в зоне external уже включен «маскарад». Если нет, включаем. Он необходим для подмены ip-адреса источника для NAT. Также добавим маскарад для порта eth0, который в зоне public:
firewall-cmd --permanent --zone=public --add-masqueradeДля зоны public открываем все порты, которые нужны для Zimbra:
firewall-cmd --permanent --zone=public --add-port={25,80,110,143,443,465,587,993,995,7071,7073,7075,5222,5223,9071}/tcpДля вступления в силу настроек:
firewall-cmd --reloadПроверим текущие настройки зоны external и public:
[root@zturn loki]# firewall-cmd --zone=external --list-all
external (active)
target: default
icmp-block-inversion: no
interfaces: eth1
sources:
services:
ports:
protocols:
masquerade: yes
forward-ports: port=47600:proto=tcp:toport=22:toaddr=
port=9090:proto=tcp:toport=22:toaddr=10.112.203.29
port=25:proto=tcp:toport=:toaddr=10.112.203.29
port=80:proto=tcp:toport=:toaddr=10.112.203.29
port=110:proto=tcp:toport=:toaddr=10.112.203.29
port=143:proto=tcp:toport=:toaddr=10.112.203.29
port=443:proto=tcp:toport=:toaddr=10.112.203.29
port=465:proto=tcp:toport=:toaddr=10.112.203.29
port=587:proto=tcp:toport=:toaddr=10.112.203.29
port=993:proto=tcp:toport=:toaddr=10.112.203.29
port=995:proto=tcp:toport=:toaddr=10.112.203.29
port=7071:proto=tcp:toport=:toaddr=10.112.203.29    ---- в продакш отключить!
port=7073:proto=tcp:toport=:toaddr=10.112.203.29
port=7075:proto=tcp:toport=:toaddr=10.112.203.29
port=5222:proto=tcp:toport=:toaddr=10.112.203.29
port=5223:proto=tcp:toport=:toaddr=10.112.203.29
port=9071:proto=tcp:toport=:toaddr=10.112.203.29
source-ports:
icmp-blocks:
rich rules:

[root@zturn loki]# firewall-cmd --zone=public --list-all
public (active)
target: default
icmp-block-inversion: no
interfaces: eth0
sources:
services: ssh
ports: 25/tcp 80/tcp 110/tcp 143/tcp 443/tcp 465/tcp 587/tcp 993/tcp 995/tcp 7071/tcp 7073/tcp 7075/tcp 5222/tcp 5223/tcp 9071/tcp
protocols:
masquerade: no
forward-ports:
source-ports:
icmp-blocks:
rich rules:
Не забываем блокировать черные списки сетей или адресов, отправляя их в зону drop:
firewall-cmd --zone=drop --add-source=x.x.x.x/xxПроверяем работу.
Внимание
Для правил, которые должны действовать на постоянной основе, добавляем в команду
--permanent. Но тогда для вступления в силу надо перегрузить файрволfirewall-cmd --reload.Вариант 2: добавлять правила без
--permanent, а потом ввести команду--runtime-to-permanent.
Альтернативное назначение сетевых интерфейсов на постоянной основе в определенную зону в файлах, например: добавим ZONE=external в файл /etc/sysconfig/network-scripts/ifcfg-eth1 и ZONE=public в /etc/sysconfig/network-scripts/ifcfg-eth0. В облачной версии CentOS7 отключена утилита nmcli, но в стандартной версии и в новой версии CentOS8 надо всё настраивать через nmcli:
nmcli con mod eth0 connection.zone public
nmcli con mod eth1 connection.zone external
nmcli con reload
Настройка пакета resiprocate
В релизе 1.8 к reTurn серверу добавлен конфигурационный файл /etc/reTurn/reTurnServer.config
## Transport
TurnAddress = 89.208.221.15
TurnV6Address = ::0
TurnPort = 3478
# по умолчанию 3549
TlsTurnPort = 0
AltStunAddress = 0.0.0.0
AltStunPort = 0

## Logging settings
# Logging Type: syslog|cerr|cout|file
LoggingType = file
# For syslog, also specify the facility, default is LOG_DAEMON
SyslogFacility = LOG_DAEMON
# Logging level: NONE|CRIT|ERR|WARNING|INFO|DEBUG|STACK
LoggingLevel = DEBUG
LogFilename = /var/log/reTurnServer/reTurnServer.log
LogFileMaxLines = 0

## UNIX related settings
# Must be true or false, default = false, not supported on Windows
Daemonize = true
# On UNIX it is normal to create a PID file if unspecified, no attempt will be made to create a PID file
#PidFile = /var/run/reTurnServer/reTurnServer.pid
# UNIX account information to run process as
RunAsUser = return
RunAsGroup = return

## Authentication settings
# Authentication Realm for Long Term Passwords
AuthenticationRealm = reTurn
# Логины и пароли хранятся в отдельном файле (указан ниже) в формате
# login:password:realm:state
# Обычно поле realm должно совпадать со значением AuthenticationRealm, заданным выше.
# Статусы пользователя:
# authorized (user authorized)
# refused (user denied access)
# restricted (for when bandwidth limiting is implemented)
# Формат файла взаимозаменяем с базой пользователей [TurnServer.org](http://TurnServer.org) - логин и пароль из файла ниже будет использоваться в Zextras на Zimbra Mail
UserDatabaseFile = /etc/reTurn/users.txt
UserDatabaseHashedPasswords = true
UserDatabaseCheckInterval = 60

## TURN Allocation settings
NonceLifetime = 3600
AllocationPortRangeMin = 49152
AllocationPortRangeMax = 65535
#    10 минут
DefaultAllocationLifetime = 600
#  1 час
MaxAllocationLifetime = 3600

## SSL/TLS Certificate settings
TlsServerCertificateFilename = server.pem
TlsServerPrivateKeyFilename =
TlsTempDhFilename = /etc/reTurn/dh2048.pem

# Оставить пустым, если ключ не шифруется
TlsPrivateKeyPassword =
Не забудем в файрволе открыть порты для resiprocate:о порт 4378 tcp/udp и диапазон портов 49152-65535 tcp/udp:
Генерируем хэш пароля, который будет в дальнейшем вставлен в /etc/reTurn/users.txt
anutkaTurn — имя пользователя, reTurn — realm, Test2019turn — пароль, который будет введен в явном виде на другой виртуальной машине, где Zimbra и Zextras Suite. При значении переменной UserDatabaseHashedPasswords = true пароль на turn сервере хранится в виде хэша.
[root@zturn centos]# echo -n anutkaTurn:reTurn:Test2019turn | md5sum
edb9c2211fe34bbce62b78b89ac4ac2d -
Заполняем эти данные с хешем пароля в /etc/reTurn/users.txt
# reTurnServer user database file
# The format of each line is:
#    login:password:realm:state
# Typically, the realm field must match the value of AuthenticationRealm
# defined in reTurnServer.config
#
# The state field (not case sensitive) can be one of:
#
#   authorized   (user authorized)
#   refused      (user denied access)
#   restricted   (for when bandwidth limiting is implemented)
#
# This file format is interchangeable with TurnServer.org's user database
#
anutkaTurn:edb9c2211fe34bbce62b78b89ac4ac2d:reTurn:authorized
Не забываем перезапустить сервис после изменений:
systemctl restart resiprocate-turn-serverHardcoded Settings
Следующие настройки «вшиты» и могут быть изменены только изменением кода в файле ReTurnConfig.cxx с последующей перекомпиляцией. The configuration framework needs to be added in order to make these settings configurable at startup time.
- Logging Level: Info
- SSL server certicate (from working directory): “server.pem”
- SSL temporary Diffie-Hellman parameters file (from working directory): “dh512.pem”
- SSL server certificate password: “test”
- Default Turn Permission inactivity seconds: 300 (5 minutes)
- Authentication Mode: RequestHandler::LongTermPassword
- Authentication Realm: “test”
- Authentication Username: “test”
- Authentication Password: “1234”
- Default Nonce Lifetime: 3600 (1 hour)
- Default Allocation Lifetime: 600 (10 minutes)
- Default Max Allocation Lifetime: 3600 (1 hour)
Смотреть полный список в ReTurnConfig.hxx.
Zimbra-Mail
Доменное имя zmail.quadra.ru, сетевой интерфейс eth0 (10.112.203.29).
[root@zmail yum.repos.d]# hostname
zmail.quadra.ru

[root@zmail yum.repos.d]# ip a
1: lo: <LOOPBACK,UP,LOWER_UP> mtu 65536 qdisc noqueue state UNKNOWN group default qlen 1000
 link/loopback 00:00:00:00:00:00 brd 00:00:00:00:00:00
 inet 127.0.0.1/8 scope host lo
 valid_lft forever preferred_lft forever
 inet6 ::1/128 scope host
 valid_lft forever preferred_lft forever

2: eth0: <BROADCAST,MULTICAST,UP,LOWER_UP> mtu 1450 qdisc pfifo_fast state UP group default qlen 1000
 link/ether fa:16:3e:17:2f:ff brd ff:ff:ff:ff:ff:ff
 inet 10.112.203.29/24 brd 10.112.203.255 scope global dynamic eth0
 valid_lft 588704sec preferred_lft 588704sec
 inet6 fe80::f816:3eff:fe17:2fff/64 scope link
 valid_lft forever preferred_lft forever
Настройка файрвола firewalld
Не забыть порт 389 для ldap (виртуальная машина с Zimbra Docs будет присоединяться по этому порту).
yum install firewalld
firewall-cmd --permanent --add-port={25,80,110,143,389,443,465,587,993,995,7071,7073,7075,5222,5223,8443,9071}/tcp
firewall-cmd --reload
firewall-cmd --list-all
Note
Этого не достаточно! В mail.ru должен быть открыт порт 7071 для настройки веб-интерфейса в настройках правил группы безопасности инстанса.
Установка Zimbra Collaboration Suite
Проблема с установкой зимлетов в CentOS7:
Installing common zimlets...
  com_zimbra_adminversioncheck...failed. This may impact system functionality.
  com_zimbra_attachcontacts...failed. This may impact system functionality.
  com_zimbra_attachmail...failed. This may impact system functionality.
  com_zimbra_bulkprovision...failed. This may impact system functionality.
  com_zimbra_cert_manager...failed. This may impact system functionality.
  com_zimbra_clientuploader...failed. This may impact system functionality.
  com_zimbra_date...failed. This may impact system functionality.
  com_zimbra_email...failed. This may impact system functionality.
  com_zimbra_mailarchive...failed. This may impact system functionality.
  com_zimbra_phone...failed. This may impact system functionality.
  com_zimbra_proxy_config...failed. This may impact system functionality.
  com_zimbra_srchhighlighter...failed. This may impact system functionality.
  com_zimbra_tooltip...failed. This may impact system functionality.
  com_zimbra_url...failed. This may impact system functionality.
  com_zimbra_viewmail...failed. This may impact system functionality.
  com_zimbra_webex...failed. This may impact system functionality.
  com_zimbra_ymemoticons...failed. This may impact system functionality.
  com_zextras_chat_open...failed. This may impact system functionality.
  com_zextras_drive_open...failed. This may impact system functionality.
Finished installing common zimlets.
Если был включен SELinux, выключить. Для облачной версии не нужно — и так выключено. Для постоянной настройки:
vim /etc/selinux/config или /etc/sysconfig/selinux
SELINUX=enforcing заменить на SELINUX=disabled
Выключить в реальном времени, действует до перезагрузки Linux:
setenforce 0Под пользователем zimbra установить вручную все зимлеты из каталога /opt/zimbra/zimlets. Остановить сервис zimbra. Проверить наличие процессов с упоминанием zimbra. Если такие остались, остановить их вручную. Запустить сервис zimbra. Проверить статус.
su - zimbra
cd /opt/zimbra/zimlets
for A in *; do zmzimletctl -l deploy $A; done   # НЕ РАБОТАЕТ! ТОЛЬКО ПО ОТДЕЛЬНОСТИ, ПРОВЕРИТЬ!
zmcontrol stop
ps ax | grep zimbra
kill -9 <no_pid>
zmcontrol start
zmcontrol status
Проверка статуса, если мы под root:
su - zimbra -c "zmcontrol status"Статус, когда проблемы:
[zimbra@zmail zimlets]$ zmcontrol status
Search error: Unable to determine enabled services from ldap.
Enabled services read from cache. Service list may be inaccurate.
Host zmail.quadra.ru
amavis                  Running
antispam                Running
antivirus               Running
dnscache                Running
ldap                    Running
logger                  Stopped
zmlogswatchctl is not running
mailbox                 Stopped
zmmailboxdctl is not running.
memcached               Running
mta                     Stopped
postfix is not running
opendkim                Stopped
zmopendkimctl is not running.
proxy                   Stopped
proxy is not running.
service webapp          Stopped
zmmailboxdctl is not running.
snmp                    Stopped
zmswatch is not running.
spell                   Running
stats                   Stopped
zimbra webapp           Stopped
zmmailboxdctl           is not running.
zimbraAdmin webapp      Stopped
zmmailboxdctl is not running.
zimlet webapp           Stopped
zmmailboxdctl is not running.
zmconfigd               Running
Правильный статус:
[zimbra@zmail ~]$ zmcontrol status
Host zmail.quadra.ru
amavis                  Running
antispam                Running
antivirus               Running
dnscache                Running
ldap                    Running
logger                  Running
mailbox                 Running
memcached               Running
mta                     Running
opendkim                Running
proxy                   Running
service webapp          Running
snmp                    Running
spell                   Running
stats                   Running
zimbra webapp           Running
zimbraAdmin webapp      Running
zimlet webapp           Running
zmconfigd               Running
Смена пароля администратора веб-интерфейса:
[root@zmail centos]# su - zimbra
Last login: Mon Nov 18 22:47:45 MSK 2019 on pts/0
[zimbra@zmail ~]$ zmprov gaaa admin@zmail.quadra.ru
[zimbra@zmail ~]$ zmprov sp admin@zmail.quadra.ru новый_пароль
Разблокировка аккаунта (мне не нужно было):
zmprov ma admin@zmail.quadra.ru zimbraAccountStatus activeКорректное удаление Zimbra
Из каталога, куда разархивирована Zimbra.
./install.sh -u
yum remove zimbra-openjdk
Включить дополнительно http
По умолчанию включен только https с самоподписанным сертификатом. Если очень нужно включить http, включить:
# su - zimbra
$ zmtlsctl both

Attempting to query proxy ([mail.quaded.com](http://mail.quaded.com)) settings for zimbraReverseProxyMailMode and zimbraReverseProxySSLToUpstreamEnabled.
On proxy ([mail.quaded.com](http://mail.quaded.com)): zimbraReverseProxyMailMode='https', zimbraReverseProxySSLToUpstreamEnabled='TRUE'
Attempting to set ldap config zimbraMailMode both on host [mail.quaded.com](http://mail.quaded.com)...done.
Rewriting config files for cyrus-sasl, webxml, mailboxd, service, zimbraUI, and zimbraAdmin...done.

$ zmcontrol restart- https — доступ только по https
- http — доступ только по http
- both — смешанный режим, работает http и https
Важно
Все изменения в конфигурации Zimbra производить из окружения пользователя ‘zimbra’
Установка пакета Zextras Suite
Скачать самую свежую версию с www.zextras.com или, что удобнее, с сервера. Распаковать, зайти в каталог с распакованными файлами, выполнить скрипт ./install.sh all.
wget http://download.zextras.com/zextras_suite-latest.tgz
tar zxvf zextras_suite-latest.tgz
cd zextras_suite
./install.sh all
Основные компоненты Zextras Suite:
- Zextras Core, ядро, аббревиатура Zextras Core или Core — пакет jar файлов, расширяющий возможности Zimbra
- Zextras Administration Zimlet, аббревиатура Zextras Suite Zimlet или Zimlet — административный зимлет, который имеет доступ к ядру Core и управляет им.
- ZAL — уровень абстракции с открытым кодом для Zimbra (Zimbra Abstraction Layer). The ZAL is an Open Source abstraction layer created to allow any extension to easily communicate with Zimbra Collaboration Suite, regardless of the version in use. It is released under the GPL license and thus cannot be included in the Zextras Suite package, but during the installation process the Zextras Installer will automatically detect the most appropriate library version and will download and install it autonomously. Should the automatic download fail, a direct download link will be provided: the downloaded file must be renamed to
zal.jarand copied into the “packages/” subdirectory of the Zextras Suite package. Restarting the installer will detect the new file and install it along with Zextras Suite.
Скрипт устанавливает указанные компоненты, позволяя установить по отдельности core, zimlet или все компоненты all (устанавливает ядро core и сразу за этим zimlet).
Примеры установки:
./install.sh all        # ставим всё
./install.sh -u all     # полное удаление Zextras Suite
./install.sh core       # установка ядра. Если ставим отдельно ядро и зимлет, их версии должны совпадать! Все сервисы Zimbra остановить до установки ядра или согласиться с остановкой во время установки. После установки перезапустить Zimbra
./install.sh -u core    # удаление ядра
./install.sh zimlet     # установка зимлета
./install.sh -u zimlet  # удаление зимлета
./install.sh -h         # помощь
Другие зимлеты Zextras: в то время как пакет Zextras Suite включает Zextras Administration Zimlet, зимлеты Zextras Chat Zimlet и Zextras Client Zimlet надо устанавливать отдельно. Руководства в Zextras Wiki.
Zimbra 8.x Zimbra Administration Console login issue (AjxError)
Zimbra 8.x users might experience slowness and AJAX errors when accessing the Zimbra Administration Console because of the Zimbra DOS Filter. In this case, raising the number of Maximum Requests per Second is suggested (see Zextras Suite and the Zimbra DoSFilter for further informations)
Удаление Zimbra Chat. Начиная с версии 2.6.1 установщик Zextras Installer удаляет компоненты Zimbra Chat для всех кто использует или собирается использовать вместо него Zextras Chat. Чтобы это действие состоялось, сервисы LDAP и Mailbox должны быть запущены, т.к. установщик использует стандартную команду zmzimletctl для удаления зимлета Zimbra Chat.
Обновление Zimbra При обновлении Zimbra ядро Zextras Core удаляется с сервера, поэтому в случае обновления Zimbra также надо переустановить Zextras Suite. Все данные и настройки будут сохранены автоматически. Перед обновлением Zimbra убедиться, что выпущена совместимая версия Zextras Suite, обычно такой релиз появляется спустя 48 часов после выпуска новой версии Zimbra.
Патчи Zimbra Указанная выше информация применима только к обновлениям версии Zimbra, установка патчей никак не влияет на Zextras Suite, поэтому ничего переустанавливать не надо.
Minimum requirements and tweaking Zextras Suite’s impact on system resources is neglectible, but we still strongly suggest a minimum RAM of 4GB even for small environments to greatly improve your Zimbra experience.
If you are interested in optimization and tweaking we suggest to read the following article on the Zimbra wiki, which despite the title applies to both large and small deployments: http://wiki.zimbra.com/wiki/Performance_Tuning_Guidelines_for_Large_Deployments
Zextras Suite on Multiserver infrastructures Depending on the server roles in use, some additional precautions must be taken:
- Installing Zextras Suite on a Single-store infrastructure
- Installing Zextras Suite on a multiserver infrastructure including a single mailbox server is just as easy as installing it on a single-server infrastructure, as the software must only be installed on servers running the mailboxd service.
Installing Zextras Suite on a Multistore infrastructure Zextras Suite installation in a Multistore infrastructure featuring multiple mailbox servers requires the following additional precautions: Zextras Suite must be installed in ALL the store servers (the ones with the mailboxd service running). Zextras Suite uses ports 8735 and 8736 for store-to-store communication, make sure your servers can reach each other on this port and that the same port is closed to outside traffic.
The output of will give the user a concise explanation regarding the usage of the installation script.
In order to successfully perform an installation one shall need to either become the root user or execute the script with root privileges (e.g. using sudo).
Once launched the script will perform a check of your system determining your Zimbra version and checking for any preexistent installation of either Zextras Suite or Zextras Migration Tool.
Were any component of Zextras Migration Tool detected, you will be prompted to uninstall them and rerun the Zextras Suite installation script again afterwards.
Proceeding with the installation requires for the EULA of Zextras to be accepted, after which the actual installation shall take place.
Полное обновление Zextras Suite In case of a preexistent instance of Zextras Suite on your system installing a newer version will automatically perform an upgrade. See the instructions above for the installation procedure. If you just upgraded your Zimbra install, please see the Zimbra Upgrade section above.
Upgrading Zextras Suite to a different micro release (e.g. 2.16.1 to 2.16.2) Each separate server can be upgraded independently, and Zextras Suite will be fully functional even in a mixed-version environment Upgrading to a different major release (e.g. 2.14.x to 2.16.x) All servers should be upgraded at the same time, as in this case backwards compatibility is not guaranteed and Zextras Suite will not be fully functional until all nodes have been upgraded to the same version.
Post-Install and Post-Uninstall After either installing or uninstalling Zextras Suite, it’s highly suggested to clear both your browser’s and server’s cache. Для очистки серверного кэша Zimlet от лица пользователя zimbra выполнить:
zmprov fc zimletWhile the Zextras Suite package includes the Zextras Administration Zimlet, the Zextras Chat Zimlet and the Zextras Client Zimlet must be deployed separately.
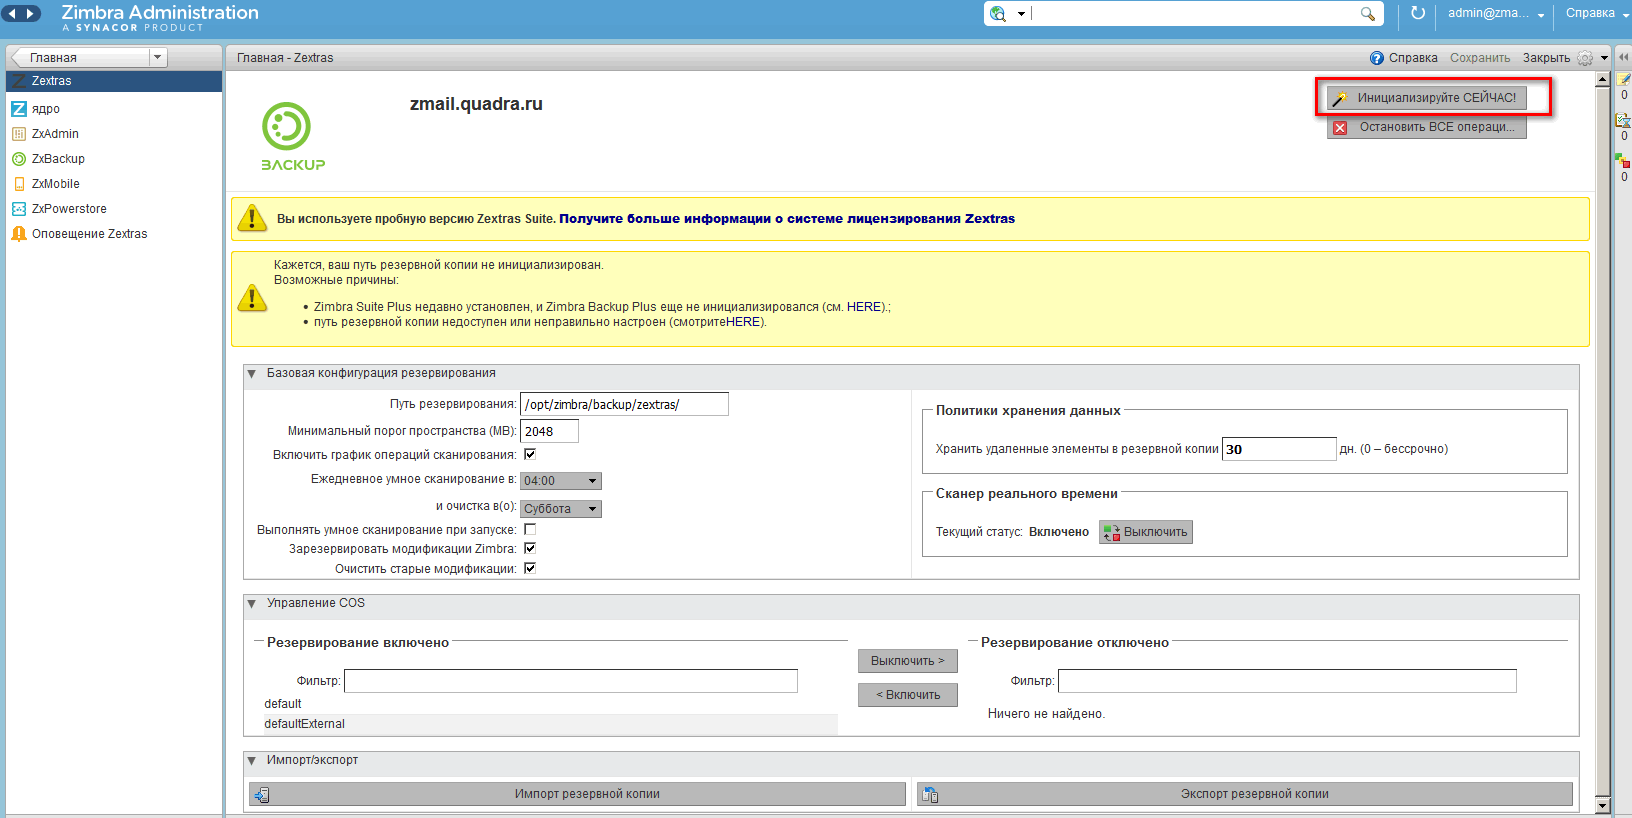
Инициализация бэкапа
[zimbra@zmail ~]$ zxsuite backup monitor f200b3e9-c694-482e-a46f-a13d58920003

 --
 Account scanned:                  0/4
 Account updated/new:              0/0
 Item scanned:                     0
 Item updated/new/unique:          0/0/0
 --
 Account scanned:                  0/4
 Account updated/new:              0/0
 Item scanned:                     0
 Item updated/new/unique:          0/0/0
 --
 Account scanned:                  0/4
 Account updated/new:              0/0
 Item scanned:                     0
 Item updated/new/unique:          0/0/0
 --
 Account scanned:                  0/4
 Account updated/new:              0/0
 Item scanned:                     0
 Item updated/new/unique:          0/0/0
 --
 Account scanned:                  4/4
 Account updated/new:              0/4
 Item scanned:                     198
 Item updated/new/unique:          0/198/134

== Notifications ==
Subject: Zextras Backup Notification, Smart Scan started.
Date: 19/11/2019 17:22:18
Level: Information
Server: zmail.quadra.ru
Text:
This is an automated notification from Zextras Backup about Smart Scan.
Operation Smart Scan Started.
Operation Id: f200b3e9-c694-482e-a46f-a13d58920003
Operation Host: zmail.quadra.ru
Monitor Command: zxsuite backup monitor f200b3e9-c694-482e-a46f-a13d58920003
Operation requested by: admin@zmail.quadra.ru
ZeXtras Suite Version: 3.0.3
ZeXtras Suite commit: 1c551d64019f38573a7c985f19ab1c452315c84f
ZAL Version: 2.9.1
ZAL commit: 8c93dddfeadc9b878c0493d712a2bd965adb438c
Zimbra version: 8.8.15_GA_3888 20191009115742 20191009-1220 FOSS
Operation parameters:  requesterAddress = admin@zmail.quadra.ru
 additionalNotificationAddresses = admin@zmail.quadra.ru
 origin = SOAP
 isDeep = false

Subject: Zextras Backup Notification, Smart Scan completed.
Date: 19/11/2019 17:23:21
Level: Information
Server: zmail.quadra.ru
Text:
This is an automated notification from Zextras Backup about Smart Scan.
Operation Smart Scan Completed.
Operation Id: f200b3e9-c694-482e-a46f-a13d58920003
Operation Host: zmail.quadra.ru
Operation Start Time: 19/11/2019 17:22:18
Operation Duration: 1 minute, 3 seconds
Operation requested by: admin@zmail.quadra.ru
ZeXtras Suite Version: 3.0.3
ZeXtras Suite commit: 1c551d64019f38573a7c985f19ab1c452315c84f
ZAL Version: 2.9.1
ZAL commit: 8c93dddfeadc9b878c0493d712a2bd965adb438c
Zimbra version: 8.8.15_GA_3888 20191009115742 20191009-1220 FOSS
Operation parameters:  requesterAddress = admin@zmail.quadra.ru
 additionalNotificationAddresses = admin@zmail.quadra.ru
 origin = SOAP
 isDeep = false

- stats -
 new accounts: 4
 accounts updated: 0
 accounts deleted: 0
 skipped accounts(by COS): 0
 item updated: 0
 item deleted: 0
 new metadata: 198
 new files: 134
 checked items: 198
 backup path: /opt/zimbra/backup/zextras
 skipped items: 0
 I/O read exception: 0
 num skipped files: 0
 items/sec: 3
 additional notification mails: admin@zmail.quadra.ru
Настройка для коммуникатора Team
[zimbra@zmail ~]$ zxsuite Team iceServer

Edit the list of ice servers which will be used to establish connections for video calls.
Configuration available for global(default), cos or account.

add - add ice server condidates using global (default), cos or account
zxsuite team iceServer add {turn:[turn.example.com](http://turn.example.com):3478?transport=udp} [attr1 value1 [attr2 value2...]]

remove - remove ice server condidates using global (default), cos or account
zxsuite team iceServer remove {turn:[turn.example.com](http://turn.example.com):3478?transport=udp} [attr1 value1 [attr2 value2...]]

get - get ice server condidates using global (default), cos or account
zxsuite team iceServer get [attr1 value1 [attr2 value2...]]
Настраиваем соединение с TURN сервером. Здесь вводится пароль, хеш которого генерировали на turn сервере. Только здесь сам пароль, а не хэш, вводим.
zxsuite Team iceserver add turn:[zturn.quadra.ru](http://zturn.quadra.ru) credential Test2019turn username anutkaTurnКомандная строка Zimbra
Для исполнения команд перейти в учетную запись zimbra: su - zimbra. Делала настройки:
zmprov ms `zmhostname` zimbraImapNumThreads 500
zmprov ms `zmhostname` zimbraHttpNumThreads 600
zmprov mcf zimbraLmtpNumThreads 40

zmprov mcf zimbraMailProxyReconnectTimeout 0
zmprov mcf zimbraMailProxyMaxFails 0
zmproxyctl restart

[zimbra@zmail ~]$ zmprov desc -a zimbraReverseProxyWorkerConnections
zimbraReverseProxyWorkerConnections
Maximum number of connections that an NGINX Proxy worker process is
allowed to handle

type : integer
value :
callback :
immutable : false
cardinality : single
requiredIn :
optionalIn : globalConfig,server
flags : serverInherited
defaults : 10240
min : 1
max : 40960
id : 725
requiresRestart : nginxproxy
since : 5.0.10
deprecatedSince :

[zimbra@zmail ~]$ zmcontrol -v
Release 8.8.15_GA_3869.RHEL7_64_20190917004220 RHEL7_64 FOSS edition, Patch 8.8.15_P4.
Установка сертификата с Let’s Encrypt
Сначала установим репозиторий EPEL, где есть свежие версии certbot. Включить опциональный канал (если у нас CentOS/RHEL/Oracle). В EC2, пользователи RHEL могут включить опциональный канал, вычитая регион EC2 для REGION.
Note
Для CentOS8/RHEL8 установка отличается.
yum install epel-release
yum -y install yum-utils
yum-config-manager --enable rhui-REGION-rhel-server-extras rhui-REGION-rhel-server-optional
Если операционная система RedHat не зарегистрирована, появится ошибка:
# yum-config-manager --enable rhui-REGION-rhel-server-extras rhui-REGION-rhel-server-optional
Loaded plugins: langpacks, product-id, subscription-manager
This system is not registered with an entitlement server. You can use subscription-manager to register.
Установить enabled=0 вместо enabled=1 в /etc/yum/pluginconf.d/subscription-manager.conf
Устанавливаем Certbot:
yum install certbot python2-certbot-apacheПредположим, мы находимся в домашнем каталоге пользователя centos: /home/centos/. На github есть репозиторий, позволяющий автоматизировать разворачивание сертификатов letsencrypt для Zimbra. Скопировать исходный код не в свой текущий каталог, а в каталог /opt/letsencrypt-zimbra:
git clone https://github.com/VojtechMyslivec/letsencrypt-zimbra.git /opt/letsencrypt-zimbraСоздать файл конфигурации из файла примера. Отредактировать файл конфигурации /opt/letsencrypt-zimbra/letsencrypt-zimbra.cfg, добавив туда свою почту и имя сайта
cp /opt/letsencrypt-zimbra/letsencrypt-zimbra.cfg{.example,}
vim /opt/letsencrypt-zimbra/letsencrypt-zimbra.cfgemail="admin@zmail.quadra.ru"
common_names=( "zmail.quadra.ru" )
letsencrypt="/usr/bin/certbot" # не меняли
zimbra_dir="/opt/zimbra" # не меняли Пользователю zimbra добавим привилегий, чтобы он мог выполнять команды certbot. Есть уже подготовленная конфигурация, которую копируем в каталог с настройками sudoers:
cp /opt/letsencrypt-zimbra/configs/sudoers.conf /etc/sudoers.d/02_zimbra_certbotДля изучения можем посмотреть, что это за настройки: пользователь zimbra без пароля выполняет команду certbot.
## /etc/sudoers.d/zimbra
#
# standard path for certbot from ppa on Ubuntu
zimbra ALL=(root) NOPASSWD: /usr/bin/certbot

# if you clone the certbot from github, use following line instead
#zimbra ALL=(root) NOPASSWD: /opt/certbot/certbot

# provide full path to certbot in other cases
#zimbra ALL=(root) NOPASSWD: /path/to/certbot
Обязательно проверяем, что указан правильный путь к программе certbot. В нашем случае не важно, что указано. Команда which certbot показывает его расположение в /bin/certbot. А фактически и /bin/certbot, и /usr/bin/certbot являются ссылками на /usr/bin/certbot-2. Поэтому в конфигурации для sudoers можно указать как /usr/bin/certbot, так и /bin/certbot.
[root@zmail centos]# certbot --version
certbot 0.39.0
[root@zmail centos]# which certbot
/bin/certbot
[root@zmail centos]# ls -la /bin/certbot
lrwxrwxrwx 1 root root 18 Dec 16 10:45 /bin/certbot -> /usr/bin/certbot-2
[root@zmail centos]# ls -la /usr/bin/certbot
lrwxrwxrwx 1 root root 18 Dec 16 10:45 /usr/bin/certbot -> /usr/bin/certbot-2
Протестируем исполнение команд certbot от лица пользователя zimbra без ввода пароля. Должна отобразиться подсказка по параметрам команды certbot:
sudo -Hu zimbra sudo /usr/bin/certbot -hВыполним скрипт для получения сертификата:
sudo -Hiu zimbra /opt/letsencrypt-zimbra/obtain-and-deploy-letsencrypt-cert.sh -vNote
Добавить опцию
-tдля выполнения теста.
Добавим задание по расписанию (скопируем готовое):
cp /opt/letsencrypt-zimbra/configs/cron.conf /etc/cron.d/letsencrypt-zimbraПросмотрим содержимое задания на расписание vim /etc/cron.d/letsencrypt-zimbra. У нас обновление сертификата происходит в 0:42 ежедневно. От лица пользователя zimbra запускается скрипт obtain-and-deploy-letsencrypt-cert.sh с параметром -q (это тихий режим «quiet» для заданий cron, перезаписывает -v режим, когда отображается всё что происходит во время исполнения скрипта.
## crontab
# Define MAILTO variable to reflect your local mail delivery configuration
MAILTO=root
# renew the certificate
42 0 * * * zimbra /opt/letsencrypt-zimbra/obtain-and-deploy-letsencrypt-cert.sh -q
Здесь не привожу полное содержимое скрипта, его можно открыть для изучения в Linux CLI. Также можно изучить пример конфигурации letsencrypt-zimbra.cfg.example и выполнить команду подсказки, которая выведет описание скрипта:
[root@zmail centos]# /opt/letsencrypt-zimbra/obtain-and-deploy-letsencrypt-cert.sh -h
USAGE
 obtain-and-deploy-letsencrypt-cert.sh -h|-V
 obtain-and-deploy-letsencrypt-cert.sh [-q|-v] [-t] [-f|-d days]

DESCRIPTION
 This script is used to issue or renew zimbra (so-called)
 commercial certificate by Let's Encrypt certification authority.
 It reads its configuration file 'letsencrypt-zimbra.cfg' which
 must be located in the same directory as this script.

The script will stop zimbra services for a while and restart
 them once the certificate is extended and deployed. If the
 obtained certificate isn't valid after all, Zimbra will start
 with the old certificate unchanged.

Friendly notice: restarting Zimbra take a while.

OPTIONS
 -h      Prints this message and exits
 -V      Prints version of the script
 -d num  Do not renew the cert if it exists and will be valid for next 'num' days (default 30)
 -f      Force renew the certificate
 -q      Quiet mode, suitable for cron (overrides '-v')
 -v      Verbose mode, useful for testing (overrides '-q')
 -t      Use staging Let's Encrypt URL; will issue not-trusted certificate, but useful for testing
Вот вкратце то, что делает скрипт:
- Проверяет установленный сертификат Zimbra TLS
- Скрипт прекращает своё исполнение, если сертификат действителен и не истекает в скором времени.
- Смотри опции
-dи-f
- Генерирует новый частный ключ Zimbra private key, если такового нет.
- Генерирует запрос подписи с указанными в конфигурации доменными именами.
- Останавливает веб-сервер Zimbra
- Выполняет
certbot(в режиме standalone) и использует сгенерированный запрос - Запускает веб-сервер Zimbra
- Проверяет выпущенный сертификат и устанавливает его для Zimbra
- Перезапускает сервисы zimbra
Как обновить список доменных имен, если есть уже установленный сертификат:
- Обновить список доменных имен в переменной
common_nameв файле конфигурацииletsencrypt-zimbra.cfg - Выполнить скрипт интерактивно с дополнительной опцией принудительного обновления
-f(force renew):
sudo -Hiu zimbra /opt/letsencrypt-zimbra/obtain-and-deploy-letsencrypt-cert.sh -vfWarning
Помнить, что Let’s Encrypt расходует лимиты rate limits (см. ниже) в процессе принудительного обновления сертификата.
Тестирование конфигурации в стейджинге: Let’s Encrypt authority обеспечивает определенные ограничения rate limits. лучше всего протестировать настройки и скрипт в стейджинге staging environment, где лимиты увеличены:
- Certificates per Registered Domain — максимум 30,000 в неделю.
- Duplicate Certificate — максимум 30,000 в неделю.
- Failed Validations — максимум 60 в час.
- Accounts per IP Address — максимум 50 аккаунтов на 3 часа на один IP адрес.
- Для ACME v2, максимум для New Orders — 1500 новых orders за 3 часа на аккаунт.
Но сертификаты, выпущенные в стейджинге, подписаны фейковым корневым центром сертификации Fake LE ROOT CA, поэтому они не доверенные. Для использования окружения стейджинга при исполнении скрипта obtain-and-deploy-letsencrypt-cert.sh. используется опция -t (test). Также рекомендуется опция -v (verbose) для просмотра информации о том, что делает скрипт. Когда скрипт успешно развернет сертификат стейджинга, выполнить его снова с опцией -f для принудительного обновления сертификата доверенным Let’s Encrypt CA.
Настройки для FreePBX
При создании сертификата:
First i got an error "There was an error updating the directory /var/www/html/.freepbx-known.
Ввести:
fwconsole chownПримечание. Работа с certbot без скрипта для Zimbra.
Получить сертификат и заставить Certbot автоматически отредактировать конфигурацию Apache, что включит доступ HTTPS за один шаг.
sudo certbot --apacheЕсли предпочитаем самостоятельно менять конфигурацию Apache, только генерируем сертификат:
sudo certbot certonly --apacheЕсли установлен nginx, всё то же самое, только вместо --apache параметр --nginx.
Автоматическое обновление сертификата через crontab:
echo "0 0,12 * * * root python -c 'import random; import time; time.sleep(random.random() * 3600)' && certbot renew"LDAP
Zimbra LDAP CheatSheet Узнать настройки внутреннего LDAP сервера Zimbra, чтобы другой почтовый сервер узнал о наших пользователях:
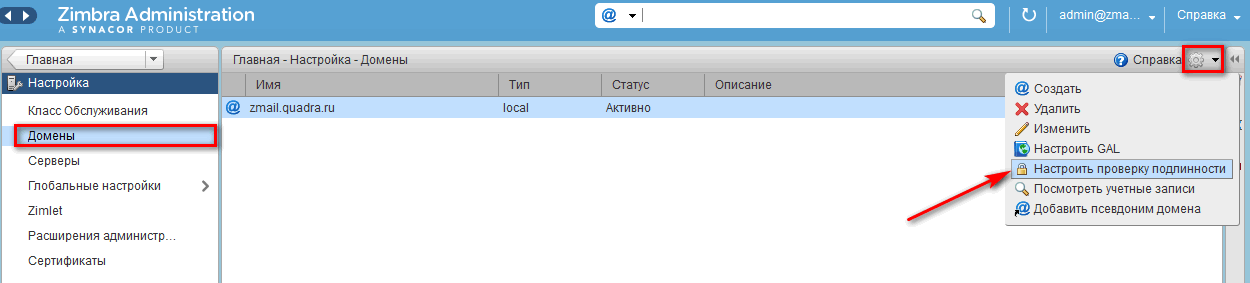
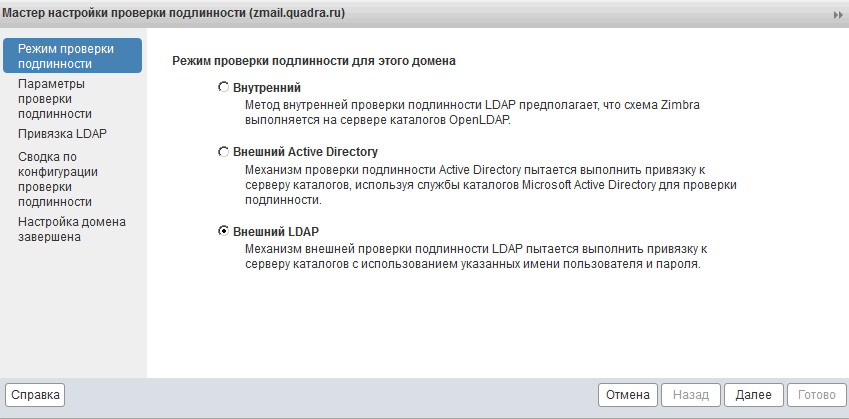
zmlocalconfig -s | grep 'ldap_' | egrep 'password|url|user'Наоборот подключиться к внешнему LDAP, Active Directory: Настройка→ Домены. Убедиться, что мы находимся на нашем домене. В правом верхнем углу нажать стрелочку→ Настроить проверку подлинности.
Zimbra-Docs
Доменное имя zdocs.quadra.ru, сетевой интерфейс eth0 (10.112.203.21)
[root@zimbra-docs yum.repos.d]# ip a
1: lo: <LOOPBACK,UP,LOWER_UP> mtu 65536 qdisc noqueue state UNKNOWN group default qlen 1000
 link/loopback 00:00:00:00:00:00 brd 00:00:00:00:00:00
 inet 127.0.0.1/8 scope host lo
 valid_lft forever preferred_lft forever
 inet6 ::1/128 scope host
 valid_lft forever preferred_lft forever
2: eth0: <BROADCAST,MULTICAST,UP,LOWER_UP> mtu 1450 qdisc pfifo_fast state UP group default qlen 1000
 link/ether fa:16:3e:43:37:02 brd ff:ff:ff:ff:ff:ff
 inet 10.112.203.21/24 brd 10.112.203.255 scope global dynamic eth0
 valid_lft 580164sec preferred_lft 580164sec
 inet6 fe80::f816:3eff:fe43:3702/64 scope link
 valid_lft forever preferred_lft forever
Узнать на виртуалке, где установлена Zimbra и Zextras Suite, URL (ldap_url) и пароль LDAP сервера (zimbra_ldap_password):
zmlocalconfig -s | grep ldap
calendar_resource_ldap_search_maxsize = 1000
enable_delegated_admin_ldap_access = true
ldap_accesslog_envflags = writemap nometasync
ldap_accesslog_maxsize = 85887791104
ldap_amavis_password = ТутПароль
ldap_bes_searcher_password = ТутПароль
ldap_bind_url =
ldap_cache_account_maxage = 15
ldap_cache_account_maxsize = 20000
ldap_cache_alwaysoncluster_maxage = 15
ldap_cache_alwaysoncluster_maxsize = 100
ldap_cache_cos_maxage = 15
ldap_cache_cos_maxsize = 100
ldap_cache_custom_dynamic_group_membership_maxage_ms = 600000
ldap_cache_domain_maxage = 15
ldap_cache_domain_maxsize = 500
ldap_cache_external_domain_maxage = 15
ldap_cache_external_domain_maxsize = 10000
ldap_cache_group_maxage = 15
ldap_cache_group_maxsize = 2000
ldap_cache_mime_maxage = 15
ldap_cache_reverseproxylookup_domain_maxage = 15
ldap_cache_reverseproxylookup_domain_maxsize = 100
ldap_cache_reverseproxylookup_server_maxage = 15
ldap_cache_reverseproxylookup_server_maxsize = 100
ldap_cache_right_maxage = 15
ldap_cache_right_maxsize = 100
ldap_cache_server_maxage = 15
ldap_cache_server_maxsize = 100
ldap_cache_share_locator_maxage = 15
ldap_cache_share_locator_maxsize = 5000
ldap_cache_timezone_maxsize = 100
ldap_cache_ucservice_maxage = 15
ldap_cache_ucservice_maxsize = 100
ldap_cache_xmppcomponent_maxage = 15
ldap_cache_xmppcomponent_maxsize = 100
ldap_cache_zimlet_maxage = 15
ldap_cache_zimlet_maxsize = 100
ldap_common_loglevel = 49152
ldap_common_require_tls = 0
ldap_common_threads = 8
ldap_common_tlsciphersuite = MEDIUM:HIGH
ldap_common_tlsprotocolmin = 3.1
ldap_common_toolthreads = 2
ldap_common_writetimeout = 360
ldap_connect_pool_debug = false
ldap_connect_pool_health_check_background_interval_millis = 30000
ldap_connect_pool_health_check_max_response_time_millis = 30000
ldap_connect_pool_health_check_on_checkout_enabled = false
ldap_connect_pool_initsize = 1
ldap_connect_pool_master = false
ldap_connect_pool_maxsize = 50
ldap_connect_pool_prefsize = 0
ldap_connect_pool_timeout = 120000
ldap_connect_timeout = 30000
ldap_db_envflags = writemap nometasync
ldap_db_maxsize = 85887791104
ldap_db_rtxnsize = 0
ldap_deref_aliases = always
ldap_dit_base_dn_admin =
ldap_dit_base_dn_alwaysoncluster =
ldap_dit_base_dn_appadmin =
ldap_dit_base_dn_config =
ldap_dit_base_dn_cos =
ldap_dit_base_dn_domain =
ldap_dit_base_dn_global_dynamicgroup =
ldap_dit_base_dn_mail =
ldap_dit_base_dn_mime =
ldap_dit_base_dn_server =
ldap_dit_base_dn_share_locator =
ldap_dit_base_dn_ucservice =
ldap_dit_base_dn_xmppcomponent =
ldap_dit_base_dn_zimlet =
ldap_dit_naming_rdn_attr_cos =
ldap_dit_naming_rdn_attr_dynamicgroup =
ldap_dit_naming_rdn_attr_globalconfig =
ldap_dit_naming_rdn_attr_globalgrant =
ldap_dit_naming_rdn_attr_mime =
ldap_dit_naming_rdn_attr_server =
ldap_dit_naming_rdn_attr_share_locator =
ldap_dit_naming_rdn_attr_ucservice =
ldap_dit_naming_rdn_attr_user =
ldap_dit_naming_rdn_attr_xmppcomponent =
ldap_dit_naming_rdn_attr_zimlet =
ldap_host = zmail.quadra.ru
ldap_is_master = true
ldap_ldapi_socket_file = ${zimbra_home}/data/ldap/state/run/ldapi
ldap_master_url = ldap://zmail.quadra.ru:389
ldap_monitor_alert_only = true
ldap_monitor_critical = 90
ldap_monitor_growth = 25
ldap_monitor_mdb = true
ldap_monitor_warning = 80
ldap_nginx_password = ТутПароль
ldap_overlay_accesslog_logpurge = 01+00:00  00+04:00
ldap_overlay_syncprov_checkpoint = 20 10
ldap_overlay_syncprov_sessionlog = 10000000
ldap_port = 389
ldap_postfix_password = ТутПароль
ldap_read_timeout = 300000
ldap_replication_password = ТутПароль
ldap_root_password = ТутПароль
ldap_starttls_required = true
ldap_starttls_supported = 1
ldap_url = ldap://zmail.quadra.ru:389
zimbra_class_ldap_client = com.zimbra.cs.ldap.unboundid.UBIDLdapClient
zimbra_class_provisioning = com.zimbra.cs.account.ldap.LdapProvisioning
zimbra_ldap_password = ТутПароль
zimbra_ldap_user = zimbra
zimbra_ldap_userdn = uid=zimbra,cn=admins,cn=zimbra
zimbra_zmprov_default_to_ldap = false
Скачать отсюда свежую версию Zextras Docs именно для своей операционной системы. Я просто копирую ссылку для дальнейшего скачивания с помощью wget.
cd /usr/src
wget https://download.zextras.com/zextras-docs-installer/latest/zextras-docs-centos7.tgz
tar xzf zextras-docs-centos7.tgz
cd zextras-docs-installer/
./install.sh
Установка:
[root@zdocs zextras-docs-installer]# ./install.sh
This script will install Zextras DOCS, and all its runtime
dependencies onto the running system.
To complete the process a working network connection is required.
System will be modified, would you like to proceed? [Y]

NOTICE
Using the package inside a Container is not supported.
This release requires systemd to work properly.

Would you like to install Zextras DOCS? [Y] y
.......
......  тут скачивание пакетов ....
Setup of Zextras DOCS
Please enter information to access the master ldap
LDAP url (None): ldap://zmail.quadra.ru:389             # этот порт должен быть открыт на zmail.quadra.ru
LDAP dn (uid=zimbra,cn=admins,cn=zimbra):
LDAP password (None): ТутПароль
Trying to connect to LDAP...OK
Configuration written
Key not existing, generating a new one
.......................................+++
.........+++
Generated key in /opt/zimbra/conf/docs/key.pem
Adding server bf50800b-7c4a-416f-8d3e-45e69ed64abb with hostname 'zdocs.quadra.ru' in LDAP
Changes applied
Config written
systemctl restart zextras-docs-server
Setup successfully completed.
Правила iptables (неактуально, т.к. перешли на firewalld)
Сохранено для примера. Рабочие правила iptables. Вместо -d 89.208.221.15 можно указать интерфейс -i eth1. Полную запись --to-destination и --to-source можно заменить сокращением --to.
Набор портов: 25,80,110,143,443,465,587,993,995,7071,7073,7075,5222,5223,9071. В примере указан сокращенный набор портов
iptables -t nat -A PREROUTING -d 89.208.221.15 -p tcp -m multiport --dports 80,443,143,993,110,995,25,587,7071 -j DNAT --to-destination 10.112.203.29
iptables -t nat -A POSTROUTING -d 10.112.203.29 -o eth0 -p tcp -m multiport --dports 80,443,143,993,110,995,25,587,7071 -j SNAT --to-source 10.112.203.25
iptables -A FORWARD -d 10.112.203.29 -i eth1 -o eth0 -p tcp -m multiport --dports 80,443,143,993,110,995,25,587,7071  -m state --state NEW,ESTABLISHED,RELATED -j ACCEPT
Сохранение правил:
iptables-save > /etc/sysconfig/iptablesСтереть существующие правила:
iptables -F
iptables -t nat -F
iptables -t mangle -F
Настроены правила через iptables для проброса портов почты на Zimbra-Mail.
Tест
Разрешаем транзитные пакеты:
iptables -A FORWARD -i eth0 -o eth1 -s 10.112.203.0/24 -j ACCEPT
iptables -A FORWARD -i eth1 -o eth0 -d 10.112.203.0/24 -j ACCEPT
iptables -A FORWARD -p tcp -d 10.112.203.29 -m multiport --dport 25,80,110,143,389,443,465,587,993,995,7071,7073,7075 -m state --state NEW,ESTABLISHED,RELATED -j ACCEPT
iptables -P FORWARD DROP
iptables -t nat -A POSTROUTING -s 10.112.203.0/24 -o eth1 -j SNAT --to-source 89.208.221.15
iptables -t nat -A PREROUTING -i eth1 -p tcp -m multiport --dports 25,80,110,143,389,443,465,587,993,995,7071,7073,7075 -j DNAT --to-destination 10.112.203.29
iptables -t nat -A PREROUTING -i eth1 -p tcp -m tcp --dport 7071 -j DNAT --to-destination 10.112.203.29
iptables -t nat -A POSTROUTING -o eth1 -j MASQUERADE
iptables -I FORWARD 1 -j LOG
iptables -I OUTPUT 1 -j LOG
iptables -t nat -I PREROUTING 1 -j LOG
iptables -t nat -I POSTROUTING 1 -j LOG
iptables -t nat -I OUTPUT 1 -j LOG
iptables -t nat -A POSTROUTING -s 10.0.0.0/8 -j MASQUERADE
iptables -A FORWARD -p tcp -d 10.112.203.29 -m multiport --dport 80,443,143,993,110,995,25,587,7071 -m state --state NEW,ESTABLISHED,RELATED -j ACCEPT
iptables -A INPUT -p tcp -m multiport --dports 80,443,143,993,110,995,25,587,7071 -j ACCEPT
Защита от спама
Back in 2014 I wrote a good chunk of the Zimbra Anti-Spam Strategies community wiki. In the intervening five years, a lot has changed, but unfortunately email remains the number one attack vector for malware, phishing, whaling and other scams.
In this blog post we describe how we supplement the various open-source anti-spam capabilities that ship with Zimbra with two commercial block list providers for a low-cost, high-impact solution. For customers with additional compliance, email continuity, data loss prevention and archiving needs, we offer Mimecast, Gartner’s consistent top player in the Secure Email Gateway space.
Our two favorite commercial (i.e. paid) block list providers are invaluement and uribl. Our favorite free block list provider is Barracuda (but be sure to register your IP addresses before trying to use it.) Spamhaus’s terms of service now prohibit usage of their block lists for commercial purposes except via a paid subscription. We found in testing that Spamhaus caught very little that Barracuda didn’t. So we ourselves do not use Spamhaus, though many of our customers do and with good success.
But there is more to anti-spam than just blocking inbound junk email. A good anti-spam strategy extends to endeavoring to ensure that your email system and domain is not a source of spam, so we’ll introduce our best practices in that space as well in a future blog post.
Above all, we cannot overemphasize the need for periodic end-user training. Anti-spam will never be perfect, so users need to be trained when to pause, take a deep breath and think before they open or reply to an email. When a user receives an email from someone they know, but the email seems suspicious, DO NOT REPLY to the email! Instead, train your users to FORWARD the email to the (alleged) original sender. This is because the “From:” portion of an email can be easily forged, but the recipient will have the correct email address for the sender in their Address Book.
This “forged sender” technique is typically how those emails purporting to be from the CFO and ordering expediting payment to a vendor (really the scammer who sent the email in the first place) cause so much trouble; the poor accounting clerk thinks s/he is replying to the CFO, but is really replying to the scammer.
Lastly, in most of the recent email hacks with which I am familiar, two-factor authentication would have prevented the exploit from being deployed, so we are strongly encouraging our customers to deploy two-factor authentication — it’s really not as inconvenient to use as most people presume.
Anti-Spam Quick Level Set: терминология, подходи и техники (способы блокирования)
Here are some key terms and concepts to make sure we are all on the same page:
- Gray Mail – Email that technically isn’t spam, but that most users don’t want. You downloaded a whitepaper and had to give up your email address, so now you are receiving all kinds of offers via email that you technically authorized when you accepted the terms and conditions to be able to download that whitepaper.
- Spam – For our purposes, “spam” is email that has been determined to be junk. In the United States, the CAN-SPAM Act has a more rigorous definition. In countries covered by the GDPR, “UCE” or Unsolicited Commercial Email is even more heavily restricted. If an email is unequivocally junk, Zimbra deletes it. If it is marginally junk, Zimbra can prepend the Subject line with a warning and place it in the user’s Junk folder. The threshold between deletion and sending on is adjustable.
- Block List – A third-party service that Zimbra can use to identify IP addresses and domains that are known spam sources, either because they are just bad guys (in the eyes of the block list provider) or because they are nice guys that have been hacked. Some block lists are very aggressive in their listing policies; others less so. There are three types of block lists:
- Left-hand side block lists for checking IP addresses (“RBLs”);
- Right-hand side block lists for checking domains (“RHSBLs”), and;
- URI block lists for checking links within an email body (“URIBLs”).
- False Positive – A legitimate email incorrectly identified as spam. Block Lists are rated on their frequency of false positives. Typically, the higher the rate of false positives, the less spam a block list will allow. This trade off between efficacy and accuracy warrants a discussion with management. Customers that have high requirements for both low false positives and near-zero spam are typically prospects for additional commercial third-party services, like Mimecast.
- Postfix – The open source MTA (Mail Transfer Agent) software included with Zimbra that accepts email from, and delivers email to, other mail servers and Zimbra mailboxes.
- Amavisd – The open source software that is tightly integrated with Postfix, and which processes emails through SpamAssassin and ClamAV before allowing Postfix to deliver them.
- SpamAssassin – A powerful open source software that ships with Zimbra and which performs hundreds of tests on an email. Each test result adds a positive (bad) or negative (good) score to an email. At the end of the exercise, SpamAssassin adds up all of the tests’ individual scores to get a combined score for the email. Scores above a certain threshold result in the email being classified as Spam. The thresholds at which SpamAssassin marks an email as Junk and delivers it to the end user, or deletes it outright are adjustable.
- ClamAV – The open source anti-virus engine that ships with Zimbra and which is preconfigured to update itself.
Our anti-spam techniques comprise deploying sensible configuration adjustments to the the open source softwares that ship with Zimbra, supplemented with two paid third-party blacklists. Budget US4.00 per mailbox per year for third-party black lists to use within Zimbra, and you will be all set. If you need more enhanced email security services like data loss prevention, end-to-end encryption, user-managed quarantines, compliance assurance and email continuity so users can send and receive emails even when Zimbra is down, you are a candidate for a Mimecast subscription.
The rest of the article presumes you have already signed up for subscriptions from invaluement and uribl (or from alternative providers you deem better suited to your environment) and want to deploy their services in Zimbra.
Стратегия 1 – Немедленное блокирование с помощью Postscreen
Postfix, который ставится вместе с установкой Zimbra, начиная с версии 8.7 идет с Postscreen, своеобразным файрволом для почты в качестве дополнительной стратегии Anti-SPAM. Postscreen эффективно блокирует злоумышленников без добавления нагрузки на сервер Zimbra. В документе Zimbra Postscreen wiki описана эта утилита и ей настройки. Один процесс postscreen обрабатывает множество входящих SMTP соединений и решает, какие клиенты могут общаться с процессом Post-fix SMTP. Отбрасывая спамботов, postscreen оставляет больше серверных SMTP процессов, доступных для законных клиентов, и задерживает наступление условий перегрузки сервера.
Zimbra Collaboration Postscreen should not be used on SMTP ports that receive mail from end-user clients (MUAs). In a typical deployment, postscreen handles the MX service on TCP port 25, while MUA clients submit mail via the submission service on TCP port 587 which requires client authentication. Alternatively, a site could set up a dedicated, non-postscreen, “port 25” server that provides submission service and client authentication, but no MX service.
Zimbra Collaboration Postscreen maintains a temporary white-list for clients that have passed a number of tests. When an SMTP client IP address iswhitelisted, postscreen hands off the connection immediately to a Postfix SMTP server process. This minimizes the overhead for legitimate mail.
In a typical production setting, postscreen is configured to reject mail from clients that fail one or more tests. Zimbra Collaboration Postscreen logs rejected mail with the client address, helo, sender and recipient information.
Zimbra Collaboration Postscreen is not an SMTP proxy; this is intentional. The purpose is to keep spambots away from Postfix SMTP server processes, while minimizing overhead for legitimate traffic.
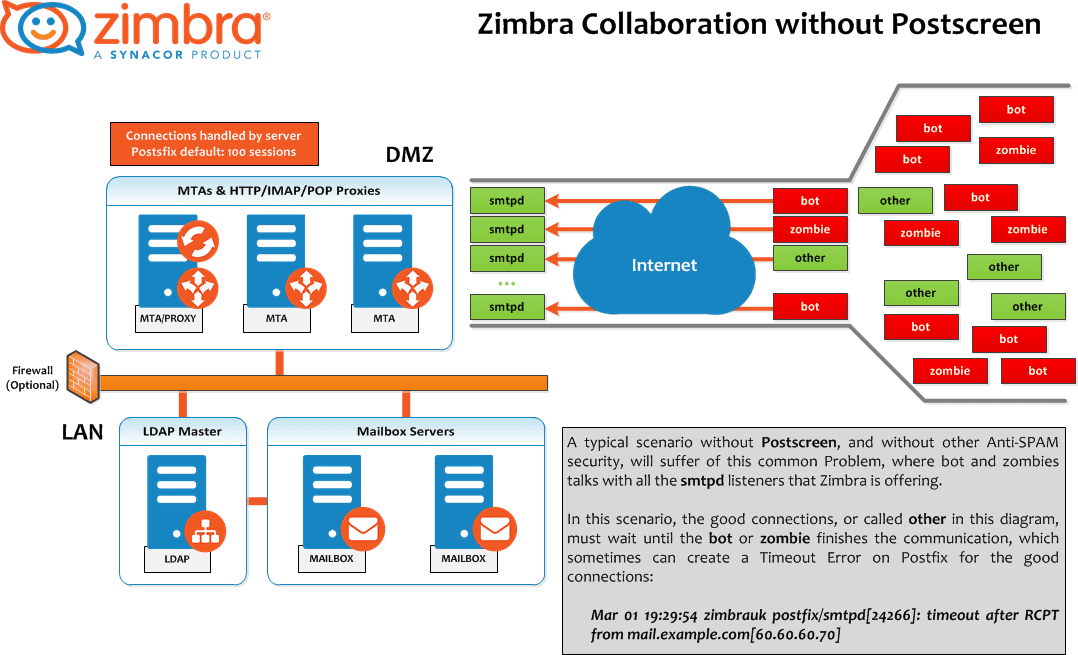
Как ранее работала Zimbra без Postscreen
A typical scenario without Postscreen, and without other Anti-SPAM security, will suffer of this common Problem, where bot and zombies talks with all the smtpd listeners that Zimbra is offering.
In this scenario, the good connections, or called other in this diagram, must wait until the bot or zombie finishes the communication, which sometimes can create a Timeout Error on Postfix for the good connections:
Mar 01 19:29:54 zimbrauk postfix/smtpd[24266]: timeout after RCPT from mail.example.com[60.60.60.70]
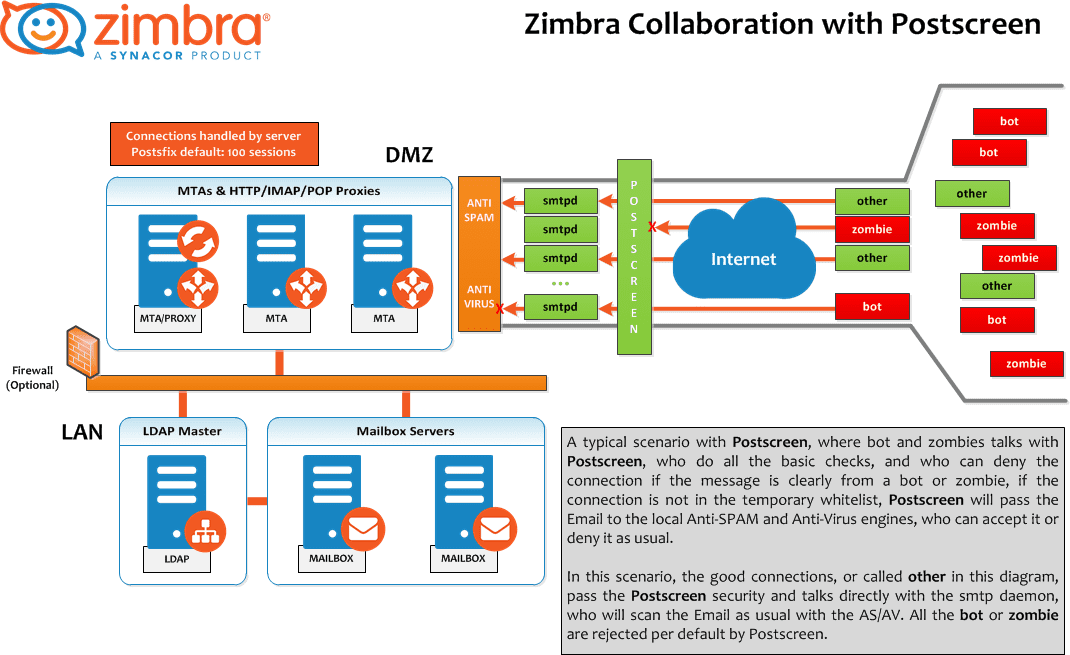
Как работает Zimbra c Postscreen
A typical scenario with Postscreen, where bot and zombies talks with Postscreen, who do all the basic checks, and who can deny the connection if the message is clearly from a bot or zombie, if the connection is not in the temporary whitelist, Postscreen will pass the Email to the local Anti-SPAM and Anti-Virus engines, who can accept it or deny it as usual. You can see how is the Mail Flow in Postscreen on the section below.
In this scenario, the good connections, or called other in this diagram, pass the Postscreen security and talks directly with the smtp daemon, who will scan the Email as usual with the AS/AV. All the bot or zombie are rejected by default.
Обработка заданий в Postscreen
See attached the workflow for Zimbra Collaboration Postscreen

Атрибуты Zimbra для Postscreen
Here you can find all the new attributes for Postscreen, and the link to the original Postfix description help per attribute. Please note the difference between the ignore, enforce and drop for certain attributes:
- ignore (default) — Ignore this result. Allow other tests to complete. Repeat this test the next time the client connects. This option is useful for testing and collecting statistics without blocking mail.
- enforce — Allow other tests to complete. Reject attempts to deliver mail with a 550 SMTP reply, and log the helo/sender/recipient information. Repeat this test the next time the client connects.
- drop — Drop the connection immediately with a 521 SMTP reply. Repeat this test the next time the client connects.
| Имя | Значение для postconf | Тип | Опционально in | Значение по умолчанию | Опции |
|---|---|---|---|---|---|
| zimbraMtaPostscreenAccessList | postscreen_access_list Single valued, commas,separated list. | string | server,globalConfig | permit_mynetworks | |
| zimbraMtaPostscreenBareNewlineAction | postscreen_bare_newline_action | enum | server,globalConfig | ignore | ignore,enforce,drop |
| zimbraMtaPostscreenBareNewlineEnable | postscreen_bare_newline_enable | enum | server,globalConfig | no | yes,no |
| zimbraMtaPostscreenBareNewlineTTL | postscreen_bare_newline_ttl | string | server,globalConfig | 30d | |
| zimbraMtaPostscreenBlacklistAction | postscreen_blacklist_action | enum | server,globalConfig | ignore | ignore,enforce,drop |
| zimbraMtaPostscreenCacheCleanupInterval | postscreen_cache_cleanup_interval | string | server,globalConfig | 12h | |
| zimbraMtaPostscreenCacheRetentionTime | postscreen_cache_retention_time | string | server,globalConfig | 7d | |
| zimbraMtaPostscreenCommandCountLimit | postscreen_command_count_limit | integer | server,globalConfig | 20 | |
| zimbraMtaPostscreenDnsblAction | postscreen_dnsbl_action | enum | server,globalConfig | ignore | ignore,enforce,drop |
| zimbraMtaPostscreenDnsblSites | postscreen_dnsbl_sites Multi valued, one DNSBL,value pair per attribute value. | string | server,globalConfig | ||
| zimbraMtaPostscreenDnsblThreshold | postscreen_dnsbl_threshold | integer | server,globalConfig | 1 | |
| zimbraMtaPostscreenDnsblTTL | postscreen_dnsbl_ttl | string | server,globalConfig | 1h | |
| zimbraMtaPostscreenDnsblWhitelistThreshold | postscreen_dnsbl_whitelist_threshold | integer | server,globalConfig | 0 | |
| zimbraMtaPostscreenGreetAction | postscreen_greet_action | enum | server,globalConfig | ignore | ignore,enforce,drop |
| zimbraMtaPostscreenGreetTTL | postscreen_greet_ttl | string | server,globalConfig | 1d | |
| zimbraMtaPostscreenNonSmtpCommandAction | postscreen_non_smtp_command_action | enum | server,globalConfig | drop | ignore,enforce,drop |
| zimbraMtaPostscreenNonSmtpCommandEnable | postscreen_non_smtp_command_enable | enum | server,globalConfig | no | yes,no |
| zimbraMtaPostscreenNonSmtpCommandTTL | postscreen_non_smtp_command_ttl | string | server,globalConfig | 30d | |
| zimbraMtaPostscreenPipeliningAction | postscreen_pipelining_action | enum | server,globalConfig | enforce | ignore,enforce,drop |
| zimbraMtaPostscreenPipeliningEnable | postscreen_pipelining_enable | enum | server,globalConfig | no | yes,no |
| zimbraMtaPostscreenPipeliningTTL | postscreen_pipelining_ttl | string | server,globalConfig | 30d | |
| zimbraMtaPostscreenWatchdogTimeout | postscreen_watchdog_timeout | string | server,globalConfig | 10s | |
| zimbraMtaPostscreenWhitelistInterfaces | postscreen_whitelist_interfaces Single valued,,comma separated list. | string | server,globalConfig | static:all | |
| zimbraMtaPostscreenDnsblMinTTL | postscreen_dnsbl_min_ttl | tbd | server,globalConfig | tbd | 60s |
| zimbraMtaPostscreenDnsblMaxTTL | postscreen_dnsbl_max_ttl | tbd | server,globalConfig | tbd | tbd |
| zimbraMtaPostscreenUpstreamProxyProtocol | postscreen_upstream_proxy_protocol | enum | server,globalConfig |
Пример настроек Postscreen
Each scenario can be different, so please tune the next values according to your own Environment, in this case all values are set at GlobalConfig level: This configuration is medium/high level, enforcing a few attributes instead of ignore, change them to drop for higher level of security
zmprov mcf zimbraMtaPostscreenAccessList permit_mynetworks
zmprov mcf zimbraMtaPostscreenBareNewlineAction ignore
zmprov mcf zimbraMtaPostscreenBareNewlineEnable no
zmprov mcf zimbraMtaPostscreenBareNewlineTTL 30d
zmprov mcf zimbraMtaPostscreenBlacklistAction ignore
zmprov mcf zimbraMtaPostscreenCacheCleanupInterval 12h
zmprov mcf zimbraMtaPostscreenCacheRetentionTime 7d
zmprov mcf zimbraMtaPostscreenCommandCountLimit 20
zmprov mcf zimbraMtaPostscreenDnsblAction enforce
zmprov mcf zimbraMtaPostscreenDnsblSites 'b.barracudacentral.org=127.0.0.2*7'
zimbraMtaPostscreenDnsblSites 'dnsbl.inps.de=127.0.0.2*7'
zimbraMtaPostscreenDnsblSites 'zen.spamhaus.org=127.0.0.[10;11]*8'
zimbraMtaPostscreenDnsblSites 'zen.spamhaus.org=127.0.0.[4..7]*6'
zimbraMtaPostscreenDnsblSites 'zen.spamhaus.org=127.0.0.3*4'
zimbraMtaPostscreenDnsblSites 'zen.spamhaus.org=127.0.0.2*3'
zimbraMtaPostscreenDnsblSites 'list.dnswl.org=127.0.[0..255].0*-2'
zimbraMtaPostscreenDnsblSites 'list.dnswl.org=127.0.[0..255].1*-3'
zimbraMtaPostscreenDnsblSites 'list.dnswl.org=127.0.[0..255].2*-4'
zimbraMtaPostscreenDnsblSites 'list.dnswl.org=127.0.[0..255].3*-5'
zimbraMtaPostscreenDnsblSites 'bl.mailspike.net=127.0.0.2*5'
zimbraMtaPostscreenDnsblSites 'bl.mailspike.net=127.0.0.[10;11;12]*4'
zimbraMtaPostscreenDnsblSites 'wl.mailspike.net=127.0.0.[18;19;20]*-2'
zimbraMtaPostscreenDnsblSites 'dnsbl.sorbs.net=127.0.0.10*8'
zimbraMtaPostscreenDnsblSites 'dnsbl.sorbs.net=127.0.0.5*6'
zimbraMtaPostscreenDnsblSites 'dnsbl.sorbs.net=127.0.0.7*3'
zimbraMtaPostscreenDnsblSites 'dnsbl.sorbs.net=127.0.0.8*2'
zimbraMtaPostscreenDnsblSites 'dnsbl.sorbs.net=127.0.0.6*2'
zimbraMtaPostscreenDnsblSites 'dnsbl.sorbs.net=127.0.0.9*2'
zmprov mcf zimbraMtaPostscreenDnsblTTL 5m
zmprov mcf zimbraMtaPostscreenDnsblThreshold 8
zmprov mcf zimbraMtaPostscreenDnsblTimeout 10s
zmprov mcf zimbraMtaPostscreenDnsblWhitelistThreshold 0
zmprov mcf zimbraMtaPostscreenGreetAction enforce
zmprov mcf zimbraMtaPostscreenGreetTTL 1d
zmprov mcf zimbraMtaPostscreenNonSmtpCommandAction drop
zmprov mcf zimbraMtaPostscreenNonSmtpCommandEnable no
zmprov mcf zimbraMtaPostscreenNonSmtpCommandTTL 30d
zmprov mcf zimbraMtaPostscreenPipeliningAction enforce
zmprov mcf zimbraMtaPostscreenPipeliningEnable no
zmprov mcf zimbraMtaPostscreenPipeliningTTL 30d
zmprov mcf zimbraMtaPostscreenWatchdogTimeout 10s
zmprov mcf zimbraMtaPostscreenWhitelistInterfaces static:all
Тестирование Zimbra Collaboration Postscreen
Customers might want to set up the DNSBLs first, for example, but leave it on ignore. Postscreen will log what it would have done, but not do anything. Once you are satisfied it looks correct, then you can set values to enforce or drop in certain cases.
A real-world log example where you can see the error 550 from postscreen:
Mar 1 02:03:26 edge01 postfix/postscreen[23154]: DNSBL rank 28 for [112.90.37.251]:20438
Mar 1 02:03:26 edge01 postfix/postscreen[23154]: CONNECT from [10.210.0.161]:58010 to [10.210.0.174]:25
Mar 1 02:03:26 edge01 postfix/postscreen[23154]: WHITELISTED [10.210.0.161]:58010
Mar 1 02:03:27 edge01 postfix/postscreen[23154]: NOQUEUE: reject: RCPT from [112.90.37.251]:20438: 550 5.7.1 Service unavailable; client [112.90.37.251] blocked using zen.spamhaus.org; from=<hfxdgdsggfvfg@gmail.com>, to=<support@zimbra.com>, proto=ESMTP, helo=<gmail.com>
Mar 1 02:03:27 edge01 postfix/postscreen[23154]: DISCONNECT [112.90.37.251]:20438
Наши настройки Postscreen
Добавляем DNS-проверку входящих соединений по наиболее популярным публичным спам-базам и автоматически задаем рейтинг письмам в зависимости от того, в какой из баз будет найден адрес отправителя. Чем больше штрафных «звезд» наберет клиент, тем более вероятно, что он является спамером. Вариант 1. Из документации.
zmprov mcf zimbraMtaPostscreenDnsblSites 'b.barracudacentral.org=127.0.0.2*7'
zimbraMtaPostscreenDnsblSites 'dnsbl.inps.de=127.0.0.2*7'
zimbraMtaPostscreenDnsblSites 'zen.spamhaus.org=127.0.0.[10;11]*8'
zimbraMtaPostscreenDnsblSites 'zen.spamhaus.org=127.0.0.[4..7]*6'
zimbraMtaPostscreenDnsblSites 'zen.spamhaus.org=127.0.0.3*4'
zimbraMtaPostscreenDnsblSites 'zen.spamhaus.org=127.0.0.2*3'
zimbraMtaPostscreenDnsblSites 'list.dnswl.org=127.0.[0..255].0*-2'
zimbraMtaPostscreenDnsblSites 'list.dnswl.org=127.0.[0..255].1*-3'
zimbraMtaPostscreenDnsblSites 'list.dnswl.org=127.0.[0..255].2*-4'
zimbraMtaPostscreenDnsblSites 'list.dnswl.org=127.0.[0..255].3*-5'
zimbraMtaPostscreenDnsblSites 'bl.mailspike.net=127.0.0.2*5'
zimbraMtaPostscreenDnsblSites 'bl.mailspike.net=127.0.0.[10;11;12]*4'
zimbraMtaPostscreenDnsblSites 'wl.mailspike.net=127.0.0.[18;19;20]*-2'
zimbraMtaPostscreenDnsblSites 'dnsbl.sorbs.net=127.0.0.10*8'
zimbraMtaPostscreenDnsblSites 'dnsbl.sorbs.net=127.0.0.5*6'
zimbraMtaPostscreenDnsblSites 'dnsbl.sorbs.net=127.0.0.7*3'
zimbraMtaPostscreenDnsblSites 'dnsbl.sorbs.net=127.0.0.8*2'
zimbraMtaPostscreenDnsblSites 'dnsbl.sorbs.net=127.0.0.6*2'
zimbraMtaPostscreenDnsblSites 'dnsbl.sorbs.net=127.0.0.9*2'
Вариант 2. От Zextras.
zmprov mcf zimbraMtaPostscreenDnsblSites 'b.barracudacentral.org=127.0.0.2*7'
zimbraMtaPostscreenDnsblSites 'zen.spamhaus.org=127.0.0.[10;11]*8'
zimbraMtaPostscreenDnsblSites 'zen.spamhaus.org=127.0.0.[4..7]*6'
zimbraMtaPostscreenDnsblSites 'zen.spamhaus.org=127.0.0.3*4'
zimbraMtaPostscreenDnsblSites 'zen.spamhaus.org=127.0.0.2*3'
Вариант 3. Если есть платный аккаунт. Спам-базы, указанные для переменной zimbraMtaPostscreenDnsblSites в стандартном документе, могут быть избыточными, и по опыту использования всех их блокировало много ложных хороших отправителей по Если есть платный аккаунт на invaluement.com, лучше добавить в качестве второй спам-базы его, первую базу barracudacentral.org оставляем, она хорошая.
zmprov mcf zimbraMtaPostscreenDnsblSites 'b.barracudacentral.org=127.0.0.2*7'
zimbraMtaPostscreenDnsblSites 'sip-sip24.<your-account-code>.invaluement.com=127.0.0.2*6'
Как отобразить текущий список спам-баз:
[zimbra@zmail ~]$ zmprov gcf zimbraMtaPostscreenDnsblSites
zimbraMtaPostscreenDnsblSites: b.barracudacentral.org=127.0.0.2*7
zimbraMtaPostscreenDnsblSites: dnsbl.inps.de=127.0.0.2*7
zimbraMtaPostscreenDnsblSites: zen.spamhaus.org=127.0.0.[10;11]*8
zimbraMtaPostscreenDnsblSites: zen.spamhaus.org=127.0.0.[4..7]*6
zimbraMtaPostscreenDnsblSites: zen.spamhaus.org=127.0.0.3*4
zimbraMtaPostscreenDnsblSites: zen.spamhaus.org=127.0.0.2*3
zimbraMtaPostscreenDnsblSites: list.dnswl.org=127.0.[0..255].0*-2
zimbraMtaPostscreenDnsblSites: list.dnswl.org=127.0.[0..255].1*-3
zimbraMtaPostscreenDnsblSites: list.dnswl.org=127.0.[0..255].2*-4
zimbraMtaPostscreenDnsblSites: list.dnswl.org=127.0.[0..255].3*-5
zimbraMtaPostscreenDnsblSites: bl.mailspike.net=127.0.0.2*5
zimbraMtaPostscreenDnsblSites: bl.mailspike.net=127.0.0.[10;11;12]*4
zimbraMtaPostscreenDnsblSites: wl.mailspike.net=127.0.0.[18;19;20]*-2
zimbraMtaPostscreenDnsblSites: dnsbl.sorbs.net=127.0.0.10*8
zimbraMtaPostscreenDnsblSites: dnsbl.sorbs.net=127.0.0.5*6
zimbraMtaPostscreenDnsblSites: dnsbl.sorbs.net=127.0.0.7*3
zimbraMtaPostscreenDnsblSites: dnsbl.sorbs.net=127.0.0.8*2
zimbraMtaPostscreenDnsblSites: dnsbl.sorbs.net=127.0.0.6*2
zimbraMtaPostscreenDnsblSites: dnsbl.sorbs.net=127.0.0.9*2
Определяем действие, которое совершается по итогам прохождения DNS-проверки. В данном случае результат проверки запоминается, а само письмо продолжает проходить дальнейшие тесты.
zmprov mcf zimbraMtaPostscreenDnsblAction enforceПоскольку в SMTP-протоколе после непосредственного соединения сервер первым начинает общение с клиентом и, соответственно, Postscreen может послать клиенту приветствие. Благодаря тому, что многие спам-клиенты, не дожидаясь окончания приветствия, начинают посылать команды, их можно легко распознать. Команда позволяет учесть результаты данной проверки, но при этом продолжать выполнить дальнейшие тесты.
zmprov mcf zimbraMtaPostscreenGreetAction enforcePostscreen позволяет отсеять те подключения, которые исходят не от почтовых клиентов. Поскольку никаких писем они не посылают, можно безо всяких опасений отключать их от сервера.
zmprov mcf zimbraMtaPostscreenNonSmtpCommandAction dropПо умолчанию в протоколе SMTP клиент может отправить лишь одну команду за раз и затем ожидать ответа сервера на эту команду. Однако многие спам-боты ведут себя иначе, отправляя множество команд, не дожидаясь ответа от сервера. Это позволяет практически безошибочно идентифицировать спам-бота.
zmprov mcf zimbraMtaPostscreenPipeliningAction enforcePostscreen экономит ресурсы, не требуя много памяти, места на диске или CPU циклов для применения. Но это тот пункт, где мы рекомендуем использовать только черные списки, у которых очень-очень низкий величина «false positives».
В течение нескольких минут демон конфигурации zmconfigd подхватит изменения и перезагрузит Postfix.
Дополнительный черный и белый список Postscreen
Данных проверок для Postscreen будет более чем достаточно для того, чтобы отсечь от сервера основную массу спам-ботов и добиться значительного снижения нагрузки на свой почтовый сервер. Живые люди будут получать сообщение о том, что их письмо не было доставлено, что значительно снижает риск потери важных писем из-за настроек Postscreen. В том случае, если такое произошло, вы можете добавить надежного отправителя в белый список Postscreen. Для того, чтобы создавать белые и черные списки Postscreen, сперва создать файл vim /opt/zimbra/common/conf/postscreen_wblist. В него добавим перечень разрешенных и запрещенных ip-адресов и подсетей в формате таблицы CIDR. Обязательно список разрешенных адресов должен быть выше списка запрещенных адресов и сетей, т.к. обрабатывается файл сверху-вниз. Для примера заблокируем подсеть 60.70.80.*, но разрешим подключение единственному ip-адресу из данной подсети:
# Rules are evaluated in the order as specified.
60.70.80.13/32 permit
60.70.80.0/24 reject
70.70.70.0/24 reject
188.65.150.0/24 reject
151.80.79.0/24 reject
23.249.162.0/24 reject
Файл создать от пользователя zimbra или после создания сменить владельца:
chown zimbra. /opt/zimbra/common/conf/postscreen_wblistПрименение настроек из указанного файла займет около минуты.
zmprov mcf zimbraMtaPostscreenAccessList "permit_mynetworks, cidr:/opt/zimbra/common/conf/postscreen_wblist"
zmprov mcf zimbraMtaPostscreenBlacklistAction enforce
Теперь Postscreen, помимо уже заданных нами проверок, будет также обращаться к файлу с белыми и черными списками, что позволит администратору легко решать вопросы с невозможностью подключения к серверу надежных отправителей.
Пример из лога:
Jun 29 05:16:22 edge04e postfix/postscreen[7546]: BLACKLISTED [188.65.150.197]:55699Черный и белый список Postfix
В Zimbra Server 8.5 и поздних версиях можно вести черный список IP адресов для подключения к Postfix. Это полезно в случае DDOS и направленных сценариев спам-атаки. Многие клиенты используют RBL для блокировки спамеров от flooding их МТА спамом. Однако это не всегда помогает решить проблему. Можно создать на диске базы данных, что позволяет вести определенный белый и черный список IP-адресов или доменов.
Создаем Белый список (Whitelist)
Создадим файл opt/zimbra/conf/postfix_rbl_override, куда добавляем доверенные IP-адреса или домены
8.8.8.8 OK
google.com OK
Выполняем команду postmap для сохранения настроек в postfix. Выполняем команду zmprov чтобы применить данные изменения в Zimbra Server.
su zimbra
postmap /opt/zimbra/conf/postfix_rbl_override
zmprov mcf +zimbraMtaRestriction 'check_client_access lmdb:/opt/zimbra/conf/postfix_rbl_override'
Создаем Черный список (blackList)
Создаем файл /opt/zimbra/conf/postfix_blacklist, куда добавляем блокируемые IP-адреса или домены
1.2.3.4 REJECT
domain.com REJECT
Применяем аналогично белому списку. Команды postmap и zmprov запускать каждый раз после изменения содержимого списка.
su zimbra
postmap /opt/zimbra/conf/postfix_blacklist
zmprov mcf +zimbraMtaRestriction 'check_client_access lmdb:/opt/zimbra/conf/postfix_blacklist'
Для ручных списков фильтрации по адресам и доменам, вставляем нужные данные в файл /opt/zimbra/conf/salocal.cf.in
blacklist_from sales@traveloforange.com
whitelist_from bill@yahoo.net
blacklist_from *@emn-mysavingsnow.net
После сохранения файла перезапускаем сервис антиспама:
su zimbra
zmamavisdctl restart
Стратегия 2 – Немедленное блокирование с проверкой протокола Postfix DNS
Внешние серверы email, пытающиеся отправить нам почту, должны работать соответствующим образом и быть настроены в соответствии с опубликованными и принятыми стандартами. большинство серверов так не настроены, и часто по допустимым причинам. Postfix, установленный вместе с Zimbra, позволяет проверять такие настройки, установив галочки в консоли администратора Home→ Configure→ Global Settings→ MTA (Главная→ Настройки→ Глобальные настройки→ Агент передачи сообщений). Но некоторые настройки могут привести к ложным срабатывания, кроме двух настроек, которые лучше всегда включать, чтобы предотвратить множество спама:
- В адресе отправителя должно быть указано полное доменное имя (
reject_non_fqdn_sender). Параметр отбросит почту, если полеMAIL FROMне является правильно сформированным почтовым адресом. - Неизвестный домен отправителя (
reject_unknown_sender_domain). Согласно документации Postfix documentation, параметр выполняет специфичные проверки, чтобы убедиться, что домен отправителя реально существует в публичном DNS. Если такого домена нет, почта не принимается.
Например почтовый ящик “johnny@hosting” будет отброшен проверкой reject_non_fqdn_sender, а ящик “johnny@hosting666.com” будет отброшен проверкой reject_unknown_sender_domain, потому что домен “hosting666.com” не существует.
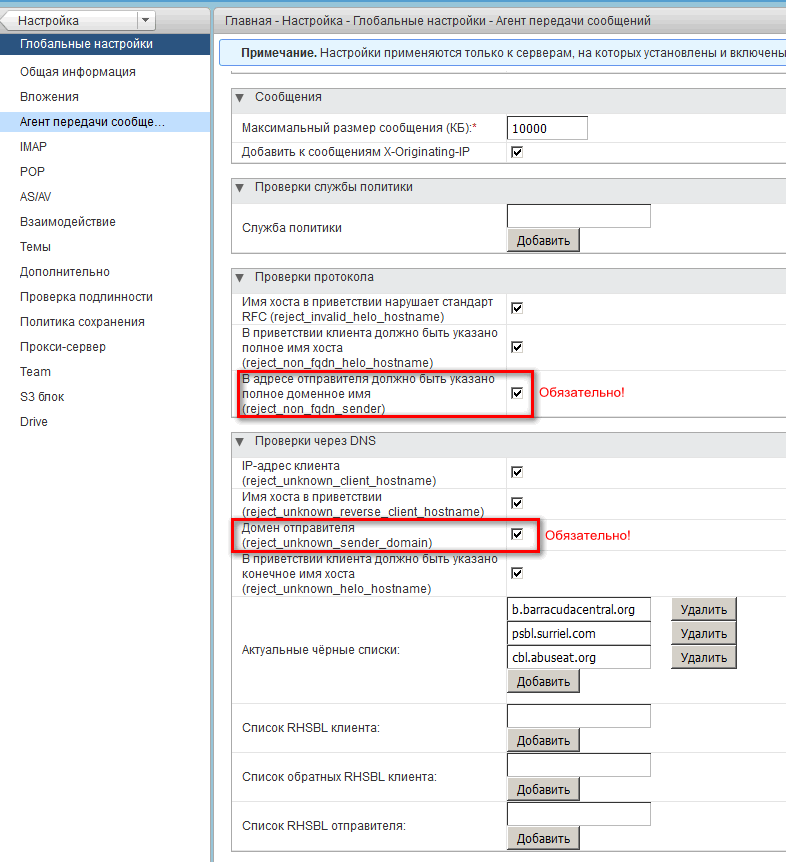
Включить то же самое из командной строки:
zmprov mcf +zimbraMtaRestriction reject_non_fqdn_sender
zmprov mcf +zimbraMtaRestriction reject_unknown_sender_domain
Стратегия 3 – Немедленное блокирование серверов, с которых рассылается спам
Now we start using blocklists within Postfix, and their are two kinds: “RBLs” or left-hand-side blocklists, and RHSBLs or right-hand-side blocklists. RBLs list IP addresses; RHSBLs list domains. Different blocklist providers have different philosophies about how IP addresses and domains get listed. Some are forthcoming and transparent; others less so. Some are clearly very aggressive in their listing methodologies and fully acknowledge they will cause some “false positives” periodically. Some have clear rules for delisting; others do not. So before you choose any blocklists to use, be sure you make sure the culture of the blacklist aligns with the culture of your company’s sensitivity to false positives. Here’s what we do (please be sure to substitute your own invalument account code first!):
zmprov mcf +zimbraMtaRestriction "reject_rbl_client b.barracudacentral.org"
zmprov mcf +zimbraMtaRestriction "reject_rbl_client sip-sip24.<account_code>.invaluement.com"
zmprov mcf +zimbraMtaRestriction "reject_rbl_client psbl.surriel.com"
zmprov mcf +zimbraMtaRestriction "reject_rbl_client cbl.abuseat.org"
Included between the three free blocklists above, we use one paid blocklist from invaluement. We spent more than nine months testing a lot of RBL providers, and invaluement came to the top based on their ability to catch spam sources really early on (before many of the majors). They have a very low false positive rate and their pricing is very fair. Lastly, they also provide URIBL checking too (but we’ll get to that in a little bit…)
Those four RBLs together we have found do a fantastic job of blocking spam from known bad IP addresses.
Стратегия 4 – Немедленное блокирование доменов, с которых рассылается спам
До текущего моменты мы использовали Postfix’s Postscreen и Postfix сами по себе, но с некоторыми RBL плагинами, для блокировки спама с известных плохих IP адресов. Следующий шаг — использовать Postfix для блокировки спама с известных зловредных доменов. В примере использованы платные аккаунты у провайдеров черных списков для получения списков RHSBL (убедиться, что использован ваш код аккаунта после подписки):
zmprov mcf +zimbraMtaRestriction "reject_rhsbl_client <account_code>.df.uribl.com"
zmprov mcf +zimbraMtaRestriction "reject_rhsbl_reverse_client <account_code>.df.uribl.com"
zmprov mcf +zimbraMtaRestriction "reject_rhsbl_sender <account_code>.df.uribl.com"
Стратегия 5 – Немедленное блокирование вложений почты с определенными расширениями
По умолчанию Zimbra не блокирует потенциально опасные вложения почты, например скрипты Visual Basic, файлы редактирования реестра Windows, исполняемые файлы и т.д. Поэтому включим блокировку таких вложений и будем уведомлять сисадмина и получателя почты о том, что такая блокировка произошла. По умолчанию Zimbra блокирует зашифрованные вложения, но сейчас в основном многие пользователи пересылают запароленные файлы друг другу, поэтому мы разрешим такие вложения.
zmprov mcf +zimbraMtaBlockedExtension asd
zmprov mcf +zimbraMtaBlockedExtension bat
zmprov mcf +zimbraMtaBlockedExtension cab
zmprov mcf +zimbraMtaBlockedExtension chm
zmprov mcf +zimbraMtaBlockedExtension cmd
zmprov mcf +zimbraMtaBlockedExtension com
zmprov mcf +zimbraMtaBlockedExtension dll
zmprov mcf +zimbraMtaBlockedExtension do
zmprov mcf +zimbraMtaBlockedExtension exe
zmprov mcf +zimbraMtaBlockedExtension hlp
zmprov mcf +zimbraMtaBlockedExtension hta
zmprov mcf +zimbraMtaBlockedExtension js
zmprov mcf +zimbraMtaBlockedExtension jse
zmprov mcf +zimbraMtaBlockedExtension lnk
zmprov mcf +zimbraMtaBlockedExtension ocx
zmprov mcf +zimbraMtaBlockedExtension pif
zmprov mcf +zimbraMtaBlockedExtension reg
zmprov mcf +zimbraMtaBlockedExtension scr
zmprov mcf +zimbraMtaBlockedExtension shb
zmprov mcf +zimbraMtaBlockedExtension shm
zmprov mcf +zimbraMtaBlockedExtension shs
zmprov mcf +zimbraMtaBlockedExtension vbe
zmprov mcf +zimbraMtaBlockedExtension vbs
zmprov mcf +zimbraMtaBlockedExtension vbx
zmprov mcf +zimbraMtaBlockedExtension vxd
zmprov mcf +zimbraMtaBlockedExtension wsf
zmprov mcf +zimbraMtaBlockedExtension wsh
zmprov mcf +zimbraMtaBlockedExtension xl
zmprov mcf +zimbraMtaBlockedExtensionWarnAdmin TRUE
zmprov mcf +zimbraMtaBlockedExtensionWarnRecipient TRUE
zmprov mcf zimbraVirusBlockEncryptedArchive FALSE
Стратегия 6 – Проверка содержимого письма
So far Postfix/Postscreen have done all of the work via low-cost DNS lookups, and all of the checks have been binary: Is the sender on a blacklist? Yes? Drop the connection or don’t accept the email. For emails which have not yet been rejected, Postfix will now accept the email and pass it off to Amavisd for processing.
Zimbra ships Amavisd preconfigured to process emails through ClamAV and SpamAssassin. Amavisd can be configured to process emails through additional third-party services (configuring that is beyond the scope of this article). Once processed, the emails are (a) delivered to the recipient (either because the email is clean, or because the email has been marked as spammy and put in the user’s Junk folder), (b) placed in a quarantine or (c) just discarded if the email’s spam score is off the charts. We control the “discard/spam/not spam” thresholds and the Subject prepend for spammy emails like so:
zmprov mcf zimbraSpamKillPercent 75
zmprov mcf zimbraSpamTagPercent 20
zmprov mcf zimbraSpamSubjectTag "** CAUTION! SUSPICIOUS EMAIL **"
Zimbra’s log file /var/log/zimbra.log contains a lot of good information about which emails are accepted/rejected, but no detail on the components of an email’s spam score. To get that detail (so we can tune things later if needed, and explain to a disgruntled user why an email was marked as spam) we need to bump up Amavis’s logging level from the default 1 to 2, like so:
zmprov mcf zimbraAmavisLogLevel 2Not all of Amavis’s configurations are adjustable via Zimbra Global Config variables. Zimbra ships Amavis’s config template file as “/opt/zimbra/conf/amavisd.conf.in”. Every time Zimbra (or just Amavis) is restarted, Zimbra’s zmconfigd configuration daemon reads this template file and rewrites the actual amavisd.conf file right before starting the amavisd service. We need to make a few minor changes…
First, SpamAssassin skips over emails with large bodies, on the premise that spammers won’t waste time sending big emails. Wrong. Spammers just pad emails with a bunch of invisible junk to avoid getting their emails’ contents checked. So we need to empower SpamAssassin to check those larger emails.
The second thing we need to do to amavisd.conf.in is whitelist Zimbra’s Daily Mail Report, else the lists of bad domains that got blocked will cause the Daily Mail Report itself to be marked as Spam.
To effect both of those changes, as the zimbra user edit /opt/zimbra/conf/amavisd.conf.in in two places:
# ORIGINAL LINE BELOW - CHANGES TO THIS FILE WILL NOT SURVIVE ZIMBRA UPGRADES
# $sa_mail_body_size_limit = 512*1024; # don't waste time on SA if mail is larger
$sa_mail_body_size_limit = 1024*1024; # don't waste time on SA if mail is larger
Lower down in the file, look for the following lines and insert a prescore for the virus notifications sender email you use (example in green):
'returns.groups.yahoo.com' => -3.0,
'clusternews@linuxnetworx.com' => -3.0,
'zimbra-notifications@missioncriticalemail.com' => -10.0,     ВОТ ЭТА СТРОКА
lc('lvs-users-admin@LinuxVirtualServer.org') => -3.0,
lc('owner-textbreakingnews@CNNIMAIL12.CNN.COM') => -5.0,

# soft-blacklisting (positive score)
'sender@example.net' => 3.0,
'.example.net' => 1.0,
Now that SpamAssassin is going to be asked to process a lot more, and bigger emails, Amavis needs a RAM disk for SpamAssassin to do that work. RAM disk provisioning varies from distribution to distribution, but on Ubuntu 16.04 with Zimbra 8.8.x and where the zimbra user’s UID and GID are both 999, you can add the following line to /etc/fstab to create a 1GB RAM disk:
tmpfs /opt/zimbra/data/amavisd/tmp tmpfs defaults,noexec,nodev,nosuid,size=1024m,mode=750,uid=999,gid=999 0 0For most Zimbra MTAs, a 1GB RAM disk will be large enough. But if you have more than the standard amavis processes running, or you allow large file size attachments, it’s possible you may need a larger RAM disk. Ralf Hildebrandt, the author of the seminal Book of Postfix, has a blog that contains the RAM disk sizing formula you can use.
Note that Amavis cannot be running if you want to implement this without a reboot. To do so on a live Zimbra system you would do:
su - zimbra  # от лица root
zmamavisdctl stop
ls /opt/zimbra/data/amavisd/tmp    # This directory should be empty with Amavis stopped
exit                               # To go back to being root
mount /opt/zimbra/data/amavisd/tmp
df -h                              # To make sure the mount succeeded
su - zimbra
zmamavisdctl start
postfix flush
ls /opt/zimbra/data/amavisd/tmp   # This directory should now have a few "amavis-2019..." directories
The SpamAssassin project periodically updates the hundreds of rules SpamAssassin uses, but Zimbra by default does not update SpamAssassin’s rules, so we need to tell Zimbra to update SpamAssassin periodically and restart SpamAssassin after an update:
zmlocalconfig -e antispam_enable_rule_updates=true
zmlocalconfig -e antispam_enable_restarts=true
ClamAV takes care of updating itself by default; Zimbra runs ClamAV’s companion “freshclam” service periodically to update ClamAV’s virus definitions. Unfortunately, the default update frequency is too infrequent for us, so to update the virus definitions every two hours we run:
zmprov mcf zimbraVirusDefinitionsUpdateFrequency 2hNow that Amavis, SpamAssasin and ClamAV are ready to zoom, we need to tweak SpamAssassin to use our paid blacklist providers, and to prevent some common false positives.
Both invaluement and uribl.com provide customers with SpamAssassin configuration files that should be placed in /opt/zimbra/data/spamassassin/localrules. These files cause SpamAssasin to perform the additional/changed email content scanning tests supported by the providers. In addition, non-Zimbra files in this directory are left intact by Zimbra’s installer, so Zimbra Patches and indeed Zimbra version upgrades will not “break” your SpamAssassin customizations.
We do need to do one more thing to customize SpamAssassin… If you have not already done so, as the zimbra user add the following lines to the above ~/data/spamassassin/localrules/sauser.cf:
score DOS_OUTLOOK_TO_MX 0
score TO_EQ_FM_DIRECT_MX 0
score RCVD_IN_PBL 0.1
score RDNS_NONE 0.1
score FREEMAIL_FORGED_REPLYTO 4.0
score RCVD_IN_RP_RNBL 4.0
score FROM_FMBLA_NEWDOM 2.5
score FROM_NEWDOM_BTC 3.0
use_bayes 0
internal_networks 10.7.57.17/32
internal_networks 10.7.57.129/32
internal_networks 10.7.57.130/32
internal_networks 10.7.57.131/32
internal_networks 10.7.57.29/32
The first three lines containing “_MX” and “_PBL” SpamAssassin tests have default scores that are really high. These tests will fire when a user with Zimbra Connector for Outlook sends emails, so we need to adjust the scores of those tests down to zero. Otherwise, emails sent from Outlook using the Outlook Connector will often be flagged as spam. The PBL test however is used by other tests, so (see below) we set this to a small value.
The next test, for Reverse DNS, also comes with a default high score, and a quick Google search will yield a lot postings complaining about the high false positive rate from this test. We can’t set this RDNS_NONE score to zero, because several other useful SpamAssassin tests depend on RDNS_NONE. But, we can set the score for this test to be really small, so it won’t result in any false positives.
The forged freemail test we give a higher score to than the default SpamAssassin score, because we see that spammers will send junk from a “real” email server, but forge the reply-to to point to a gmail, hotmail etc. mailbox. This is so that the spammer can receive replies to an email account that was not the source of the spam.
The RCVD_IN_RP_RNBL test queries a blacklist maintained by ReturnPath, who’s business centers around senders’ mostly positive reputations. You have to work very hard to get on their blacklist, and as such it has a very low false positive rate, so we boost the default score that SpamAssassin otherwise provides. More info at https://senderscore.org/.
The last two “NEWDOM” tests add points for emails being sent from brand new domains. Spammers often register new domains and send out spam until the right-hand-side blacklists start blacklisting them. These two tests cover that gap, but may cause false positives for legitimate email being sent from domains which have been registered in the past few days. But, considering it usually takes a day or two for legitimate users to set up their email after they register their domain, we consider the risk of false positives from these tests to be extremely low.
SpamAssassin also comes with a Bayes filtering engine. Bayes works great for some but not for others. In my case, I found a lot of spam-like emails would NOT get flagged as spam because the Bayes “ham” tests would add a few negative points to the email’s overall score, keeping the problematic email from being flagged as spam when it really should be. This “use_bayes 0” line turns off Bayes filtering. Another reason I try to avoid using Bayes is because doing so means the Bayes database needs to be backed up as part of a good Disaster Recovery plan. Neither the Zimbra “Classic” Network Edition backup engine, nor the ZeXtras provided Backup/Backup NG engine, back up the Bayes database themselves. Your Zimbra System Administrator would need to do that manually using the sa-learn command.
The last few lines are the IP addresses of the servers in a multi-server Zimbra hosting farm, and not just the MTA servers. The documentation on this doesn’t IMHO quite match up with reality, and the “internal_networks” parameter isn’t a white list, but in my experience you’ll have less problems if you list all of your Zimbra servers here.
Выводы
So what have we accomplished? We:
- Configured Postfix’s Postscreen and Postfix itself to outright block a huge percentage of junk email in a way that doesn’t tax the Zimbra server, because we do so using nothing more than a raft of DNS lookups.
- Blocked known dangerous attachments and configured Zimbra to let the recipient and System Administrator know that we have done so.
- Adjusted the spam scoring thresholds to values that will block more spam without increasing false positives.
- Enabled Amavis to give us more actionable information by increasing its log level.
- Improved performance by deploying a RAM disk.
- Improved accuracy by:
- Enabling SpamAssassin to update itself.
- Enabling ClamAV to update its virus definitions more frequently.
- Customizing SpamAssassin’s scores to eliminate false positives specifically for Zimbra Connector for Outlook users as well as for all users in general.
- Customizing SpamAssassin’s scores to improve spam detection overall.
- Spent somewhere between 4 per mailbox per year to get the benefit of two very good commercial blacklist providers.
- Made our users very happy and reduced frustration for the email administrators!
Zimbra also allows for and supports additional customizations to block spam that the above techniques on their own may not catch, but which may be specific to your environment. One example of this is nested email addresses intended to spoof legitimate email addresses. We wrote about Zimbra’s solution in a blog post late last year. Hopefully this solution makes it into the shipping product in the near term.
P.S. Thanks to Lorenzo Milesi at YetOpen S.r.l. and Sebastián Greco for their helpful suggestions.
The information provided in this blog is intended for informational and educational purposes only. The views expressed herein are those of Mr. Stone personally. The contents of this site are not intended as advice for any purpose and are subject to change without notice. Mission Critical Email makes no warranties of any kind regarding the accuracy or completeness of any information on this site, and we make no representations regarding whether such information is up-to-date or applicable to any particular situation. All copyrights are reserved by Mr. Stone. Any portion of the material on this site may be used for personal or educational purposes provided appropriate attribution is given to Mr. Stone and this blog.